 |
 by Amparo Bertram
|
|
by Amparo Bertram
|
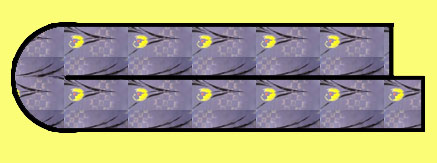
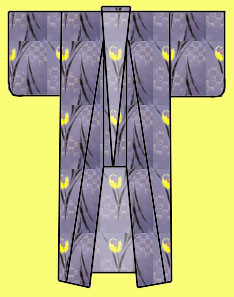
 In Japan, yukata fabric is sold in rolls that are approximately 36cm (14") wide and 11-12m (12-13yd) long. One roll makes one yukata. Some rolls can be purchased for around $30-40, though the price can reach as high as $150-200 for elaborate prints. (The tulip print used in the illustrations cost about $120 and came from one of the famous kimono textile factories in Tokamachi, Niigata Prefecture.) If you wish to use a broader fabric, you will have to adjust the placement of the pattern pieces accordingly.
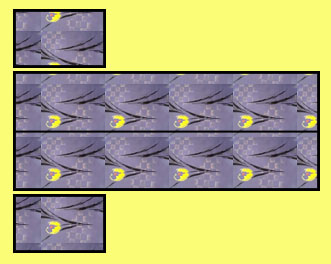
Appropriate prints for a yukata include stripes (especially for men), stylized animals (birds, butterflies, dragonflies, rabbits, dragons), Chinese characters (particularly those symbolizing happiness, good luck, and long life), and large, intensely colored flowers. Prints made specifically for yukata almost always have the same pattern running in strips alternately right side up and upside down. This is because the fabric is intended to be draped over the shoulders in long panels. If the pattern only faced one direction, either the print on the back or the print on the front would be completely upside down. (Unfortunately, the picture I took of the tulip print cut off the bloom on the downward-facing flower.)
Yukata intended for use by younger individuals to attend festivals are usually brightly colored, often to the point of appearing garish, while more mature individuals usually prefer to wear subdued browns and grays. Yukata intended to be worn as bathrobes at inns are often in deep shades of blue or green or occasionally white or maroon. Since the yukata does not have a lining, opaque fabric is best.
For those who want "unique" rather than traditional yukata, such as for a costume party, it is best to use standard Western-style fabric. Children often appreciate yukata with prints of Disney characters or other non-traditional designs. Seasonal prints, such as Halloween, Christmas, or Easter designs, can also be fun, as can bold Hawaiian prints. Using silk (to provide a more luxurious appearance), wool (for warmth in winter), or some other material will give the yukata a different feel. Just keep in mind that if the material you choose is too translucent you will want to wear some kind of undergarment beneath it...unless see-through is the effect you're going for. Using different prints for the body and sleeves or decorating the yukata with lace are other ways to personalize the finished product.
 When making traditional Japanese garments, it is customary to mark the fabric with a small plastic spatula called a hera rather than chalk or other fabric-marking devices. The fabric to be marked is laid on top of a special collapsible board made of stiff cardboard and the knifelike edge of the hera is pressed into the fabric. This leaves an indentation and marks all layers simultaneously, similar to the process of using layers of carbon paper. I assume that this is to save time by marking many layers at once. The drawback is that the indentations can be hard to see, especially if the fabric already has a striped pattern. Regular fabric-marking implements can be used if a hera is unavailable.
I am told that traditional Japanese garments are also supposed to use special long pins. Perhaps the points are tapered differently from shorter pins. However, using standard short pins is acceptable.
Japan uses the metric system, so a metric ruler is helpful when marking the fabric. I will do my best to convert measurements to inches, but they will all be approximations.
 The curve of the sleeve is marked using a (non-corrugated) cardboard pattern that has the necessary arc along one edge. You can simply make this yourself out of a piece of cardboard such as an empty cereal box. Take a square of cardboard at least 7.5cm (3") on each side (larger if you want a more gentle curve). Choose one corner and measure 3cm (1 3/16") from it on both sides. [Note: Sources vary in regard to the curve radius recommendation, from 2cm (~3/4") to 8cm (~3 1/8"). You can decide which you like best.] Draw an arc that is tangent to the two sides at the marks you made, then cut along the arc. You will have a square with three pointed corners and one rounded corner.
You will need a piece of fabric about 15cm X 30cm (6" X 12") to serve as the core of the collar. This helps it stand up straight at the back of the neck. Yukata also used to have an extra layer of fabric sewn to the underside of the shoulders and the seat area for reinforcement, but this practice has been discontinued. (This is possibly because people no longer use them enough to wear them out.)
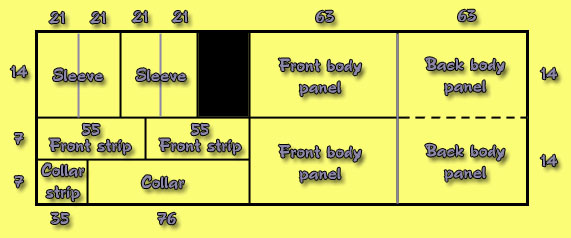
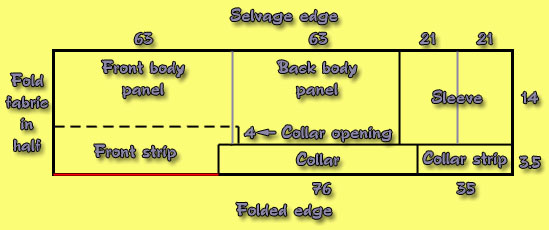
Completed Garment Measurements
| Yukata section | Length (cm) | Length (in) | Comments | |
|---|---|---|---|---|
| Sleeve length | 50 | 20 | This is the length that the sleeve will dangle downward from the wrist. Alter as desired. | |
| Wrist opening | 23 | 9 | ||
| Connection between sleeve and body | 21-23 | 8-9 | ||
| Underarm opening | 13-15 | 5-6 | Beneath the seam connecting the sleeve to the body, a gap is left open where the front panel is not sewn to the back panel. | |
| Sleeve width | 32-33 | 13 | If using a yukata fabric roll, this will be the width of the roll (minus the seam allowance). | |
| Shoulder width | 30-32 | 12 | This is the length from the back of the neck to the point where the sleeve attaches to the body. If using a yukata fabric roll, this will be the width of the roll (minus the seam allowance). | |
| Body length | 150-160* | 59-63* | This should be either the same as your height or height + 1". | |
| Back panel width at hemline | 28-30 | 11-12 | The back is constructed of two panels sewn together. | |
| Width of front panel at hemline | 23 | 9 | ||
| Width of front strip | 15 | 6 | This is a strip that connects the front panel to the collar. | |
| Width of upper collar | 5.5 | 2 | ||
| Width of lower collar | 7.5 | 3 | ||
| Length from base of collar to hemline | 75-80* | 29.5-31.5* | This should be either height/2 or height/2 + 1". | |
| * Measurements are intended for the average Japanese woman, with a height of about 5'1" and weight of about 115 pounds. | ||||
A woman's festival yukata is designed so that the hemline is pulled upward until it reaches the ankles, and then it is belted in place just above the hips. The extra flap of fabric this creates is then smoothed down to cover the belt and once again held down with a belt. This is then covered with a fancier belt that can be tied in a large bow in the back. Men do not do this triple-belting process (called ohashori); a man's yukata is simply belted once at the waist like a regular bathrobe.
A man's yukata has a shorter distance from the base of the collar to the hemline--in other words, the collar is longer. This is because the collar must be tucked under the belt at the waist or the garment will slide open. The collar is also given an extra undercollar to make it stand up straight. Instead of the "collar core" of the woman's version, for this undercollar you will need two pieces of fabric about 18cm X 30cm (7" X 12"). The measurements of the garment overall are wider on a man's yukata.
For more detailed information on how to make a man's yukata, see Alterations for Men.
The measurements given above include an ohashori allowance. Changing the placement of the first belt or the amount of fabric included in the overlapping fold is one way for women to raise or lower the hemline of the yukata. Instead of the ohashori, a man's yukata has a hem sewn into the middle of the garment around the waist (where the tuck will be covered by the belt). This way, if the bottom of the hemline gets worn, the chest hem can be let out, allowing repairs to be made without shortening the total length of the yukata. If one does not anticipate having to change the hemline, this part can be left out. (Yukata for small children have extra tucks at the shoulders that can be let out as the children grow.)
A woman who is considerably taller than about 5'3" and still wants to use a standard yukata roll will have to make adjustments or there will be insufficient fabric. One option is to make the sleeves shorter. Another option is to do without the ohashori and wear the yukata the same way a man would; in this case, leaving the sleeves long still gives it a feminine look. A third option is to consider the garment a "mini-yukata" with a high hemline. This option is also a way to make extremely long sleeves.
The width of the shoulder plus sleeve, that is, the distance from the center of the neck to the wrist, is set at about 64cm (25"). If you have broader shoulders/longer arms than this, one way to compensate is to use a narrower seam allowance, but this will only gain you about an inch. There are extra-long/extra-wide yukata rolls manufactured with a width of 39cm (15"), so that may be your only option other than switching to Western-style fabric.
The yukata panels are designed to wrap around someone with a hip measurement of about 92cm (~36"). If your hips (or waist) are wider than this, the yukata will not wrap properly. The formula for determining the front and back panel width is as follows:
Hip = circumference of hips at widest point
Front panel width = Front hip width - 15cm (6") [this is the front strip width]
Note: The back panel width (measured at the hemline) cannot be wider than the shoulder width. If your calculation has the back panel wider than the shoulder, you will have to widen the shoulder to compensate. The same goes for the front panel width. Also, the back panel should not be more than 2cm (~3/4") narrower than the shoulder.
Another alteration option for women is to move the collar opening backward past the shoulders. This makes the collar open wide in the back, revealing the nape of the neck. (This is the traditional style of certain types of kimono, such as that worn by a bride or, in contrast, a prostitute. The nape of the neck, rather than the chest, is considered a highly erotic zone.) While a good choice if using the yukata for costuming, whether for a party or a dramatic production, this style is considered too revealing for normal wear. If a man were to wear a yukata with such an open collar, it would make him appear feminine.
It is a good idea to mark the right side of the fabric if it is difficult to tell which side is which. Traditional yukata fabric looks exactly as clear and bright on the the wrong side as the right side due to the printing process. Marking the right side is to make sure that you don't accidentally flip the fabric over, thus misaligning the pattern.
Slide one edge of the fabric up until the pattern matches the way you would like it to look on the finished product.
Once you have it the way you want it, flip the fabric back over so that the top and bottom are once again layered directly on top of each other.Alteration Options
The directions given here are for a woman's yukata. A man's yukata is almost the same, but there are some stylistic differences. One major difference is in the way the sleeves are sewn. In a woman's yukata, the sleeve is sewn to the body for a length of about 23cm (9") and then the rest of that side of the sleeve is left open where it dangles. A man's yukata is attached to the body for about 42cm (16.5"), and then the part of the sleeve that dangles is sewn together on a line that slants away from the body. (Another style is to eliminate the dangling part altogether, making the sleeve more like a traditional Western sleeve.) A man's yukata also lacks the underarm opening that is left in a woman's yukata; the front and back panels are sewn together starting immediately beneath where the sleeves are attached.
Front hip width = Hip/2 - 8cm (~3 1/8")
Back panel width = (Hip - Front hip width)/2 + 1.5cm (~5/8")Pattern Matching I
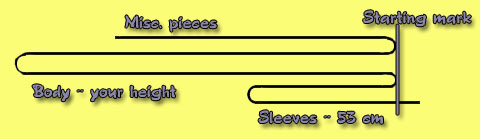
If you use a yukata roll, you will probably want to match the pattern. This means that you unroll the entire length of the fabric and fold it roughly in half, bringing the front edge to the back edge. (It is helpful to do this on a long table.) Next, flip the top layer of fabric over so that you have two long strips lying side-by-side, right side facing upward.