Marking the Collar
The directions given here are for what is called a bachi collar. This kind of collar is narrow around the neck and widens slightly toward the tips.
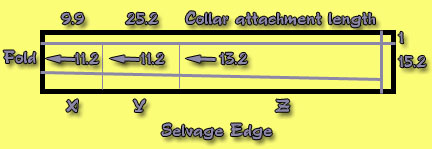
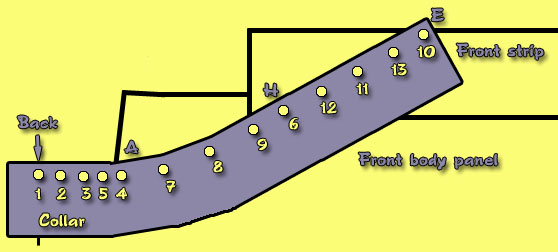
Note: The picture is not to scale. All measurements are in centimeters.
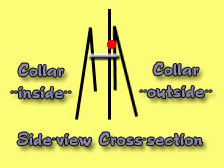
Fold the collar right sides together so that the fold is to the left and the selvage edge is nearest you (down in this diagram). Section X is the back of the neck and is attached to the back panels. Section Y comes around the sides of the neck, attached to the front panels, down to the junction with the front strips. Section Z is attached to the front strips.
The length of section X comes from the length of the neck opening (9.5cm - 1cm seam = 8.5cm) plus 0.4cm "give" allowance. Adjust as necessary if you cut a different sized neck opening. [Note: The image above neglected to account for the 1cm seam in the center back and is therefore incorrect. The total for X should be 8.9cm.]
The length of section Y should be the same as the length of line segment AC on the body panel (23cm) plus the distance the neck opening was moved back behind the shoulder fold (2cm) with a 0.2cm "give" allowance. If you moved your neck opening farther back, adjust this length as necessary.
The length of section Z should be the same as the length of line segment EH from the front strip. You should have a note of this distance.
- Mark a seam line 1cm from the cut edge.
- Measure 11.2cm straight down from the seam line along the fold and mark this point.
- On the seam line, mark the point 8.9cm from the fold. Measure 11.2cm straight down from this point and mark.
- Mark the point 25.2cm from the mark made on the seam line in step 3. Measure 13.2cm straight down from this point and mark.
- Measure the "collar attachment length" from the mark made on the seam line in step 4 and mark a vertical line down across the width of the collar.
- Measure 15.2cm down from the seam line along the line made in step 5 and mark this point.
- Mark the line connecting the lower points made in the previous steps.
Attaching the Collar
Before you attach the collar, it's a good idea to reinforce the edges of the neck opening. Cut two squares of cloth 5cm on a side. (This can be from a scrap of fabric left over, such as the end cut off when the pattern was first matched.) Fold each square along the diagonal to make a triangle.
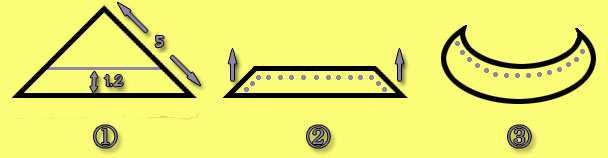
- Cut off the top of the triangle, leaving a strip about 1.2cm wide.
- Stretch the strip so that the long side curves upward. You can do this by hand, or you can run thread along the dotted line and pull on the thread to gather it.
- The result should look like a half-circle or crescent moon.
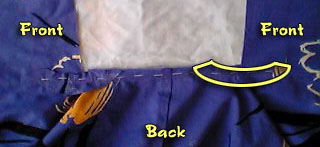 Pin the crescents on the wrong side at either end of the neck opening such that their length will be along the collar attachment line. In the picture (right), the crescent on the right has been outlined to make it easier to see. (The picture shows the neck opening spread open so that the edges of the front panels are at right angles to the back panels.)
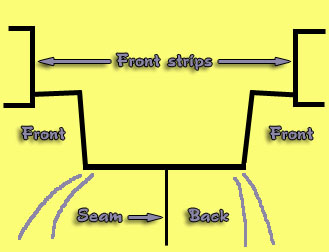 Turn the garment over so that the right side is showing, with the neck facing away from you. Open the neck so that it resembles the diagram (left). (The purple lines in the diagram indicate where wrinkles will form.)
Lay the collar on top of it, right side down, so that the selvage edge is nearest you. Pin the exact center of the collar to the center of the back of the neck so that the two cut edges match up.
Proceed to pin the collar, aligning the seam line with mark AC on the front body panel and mark EH on the front strip. Insert pins in the following order (diagram below):
- Right next to the first pin, keeping the collar flat.
- About where the wrinkles start. Begin to allow a little give in the collar.
- At the corner of the neck opening. This should be point A marked on the body panel. Due to the curve of the collar, the very corner of the neck opening should be about 0.3cm from the seam line.
- Between the previous two pins.
- Where the front panel and front strip intersect. This should be point H on the front strip. (You should actually have the seam line on the collar just 1mm above the mark on the body panel between points A and H to allow room for a kise later.)
- Between the 4th and 6th pins. Sources differ as to how many pins you should put into this space, from one to three. (In the diagram, I've marked three.) Just be certain to leave a bit of give in the collar when you pin it.
- At the point where the collar should end. This should be point E on the front panel. Keep the collar as flat as possible between this point and the 6th pin.
- Halfway between the 6th pin and the last pin.
- If necessary, add pins in the remaining spaces.
Repeat this process on the other side. When finished, carefully machine sew along the seam line. Make sure you do not sew any wrinkles into the seam at the edge of the neck opening! Another area that needs caution is point H, where you must be sure not to lose the kise of the front strip. It may help to baste the collar in place before you begin to sew. You may also want to backstitch for about 2cm around points E and H.
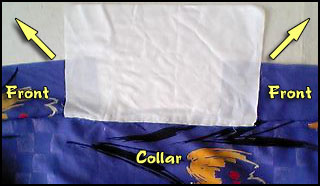 Once the collar is sewn on, place a rectangle of fabric, preferably cotton, so that it completely covers the neck opening. The recommended size varies from 10cm X 25cm to 15cm X 30cm; use your best judgment. You may lightly starch the fabric first if you like. Its purpose is to help strengthen the collar at the back of the neck. The edge of the rectangle should be about 1-2mm above the seam line of the collar. When you have it positioned properly, baste it in place.
It helps to stretch the fabric of the front body panels slightly in the direction indicated by the arrows. You may want to baste the two front panels to the collar core.
Fold the collar at the seam line, leaving a 1mm kise, and press with an iron. (Since you are pressing on the right side, make sure you have another cloth between the iron and the yukata to avoid leaving shiny marks.)
Turn the garment over so that the wrong side is showing. Fold the collar core so that it will fit inside the finished collar. The finished width at the back of the neck should be 5.5cm, so you should fold the collar core slightly smaller. Thus if your core is 10cm wide, you should fold it in half; if your core is 15cm wide, you should fold it in thirds.
Fold the collar at the line you marked connecting the points nearest the selvage edge and press. Fold over again so that this newly pressed edge just covers the collar seam line visible on the wrong side. Pin in place and press this new fold.
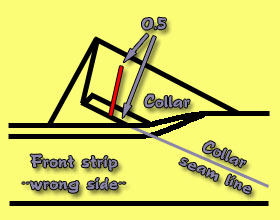
Unfold the collar's center fold and then refold it backward so that it is inside-out. Starting at a point about 0.5cm beyond the intersection with the front strip, sew across the width of the collar. This is the red line in the diagram (left). Leave about 0.5cm open near the folded edge.
Flip the collar rightside-out, making sure the new corner of the tip is as square as possible. Pin the collar back in place so that the edge just covers the seam line.Squaring the Collar
 The very tips of the collar should now be sticking out past the front strip on either side. These tips must be sewn into neat, squared-off edges. Begin by marking the point where the collar exactly meets the edge of the front strip; do this by sticking a pin in the folded edge of the collar at the point you want. Then take out the pins nearest the tip so that you can manipulate it freely.
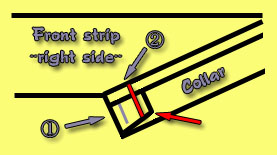 Flip the front panel over so that the right side is showing. First, fold the very tip of the collar up until the folded edge exactly reaches the intersection with the front strip (step one in the diagram at right). It helps to pull the far corner in slightly from the edge where shown by the red arrow. Second, fold the selvage edge forward along the previously ironed crease. Stitch this edge to the folded-up flap from step 1 where indicated by the red line. Make certain you only sew together these two folded edges and the inner side of the collar. Your stitches should not go completely through both layers of the collar.
 All of the stitches that you make for hemming the inside of the collar should be invisible from both the front and back because they pass between the layers of the folded collar edge as shown in the diagram (left). The purple line indicates the path of the thread.
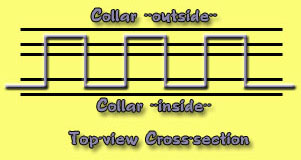 The red dot is the location of the collar seam line. Your stitches should be about 1mm beneath this line. (If you accidentally stitch above the line, the stitch will be visible.)
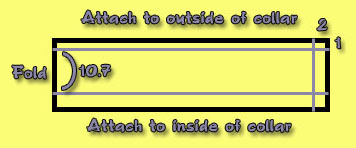 Fold the reinforcement collar in half, right sides together. Mark a line 1cm from the top edge; this is the side that will be attached to the outside of the collar. Measure 10.7cm down (from the 1cm line) along the fold and mark this point.
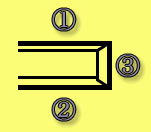 Once you have marked the lines, fold and press on each mark in the order shown in the diagram (right). Tuck the corners in slightly before step 3 to make a nice, square finish.
 Lay the yukata right-side up with the collar nearest you. Place the reinforcement collar, also right-side up, on top of the collar. The center of the reinforcement collar should line up exactly over the center of the back. The 1cm fold of the reinforcement collar should overlap the edge of the collar by 0.2cm. This should completely hide the collar from view. (In the diagram to the left, the purple lines show the outline of the reinforcement collar with the collar in black beneath it.)
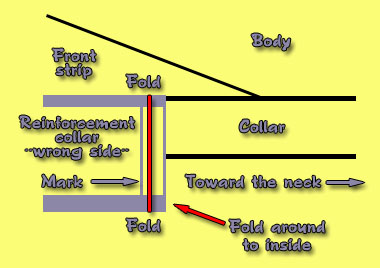 Mark where each tip falls, then remove the pins. Unfold the squared-off tip (fold number three in the diagram earlier), leaving the other two folds intact, and place it right-side down and backward so that the crease lines up exactly where you marked. The cut edge should now be pointing toward the neck as in the diagram (right).
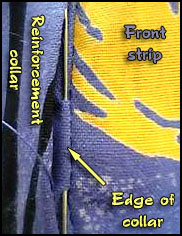 Re-fold both tips of the reinforcement collar at the crease mark and pin back in place as before, with the exact center matching up against the back of the neck. Beginning at the corner, attach the reinforcement collar to the collar using the same back-and-forth stitch that you used when hemming the collar itself.
 The one difference is that the reinforcement collar overlaps the collar by about 0.2cm along most of its length on the outside. Because of this, you should sew by inserting your needle in the very top edge of the collar, while keeping the stitches 0.2cm below the edge of the reinforcement collar. The purple line in the diagram (right) shows the path your thread should take.

