The directions below are for the second method, which is more traditional. To save time, use the first method instead and skip the step of making the tuck.
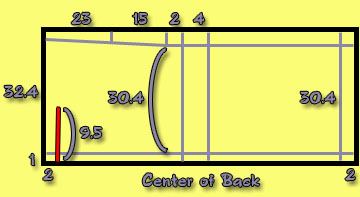
Note: The picture is not to scale. All measurements are in centimeters.
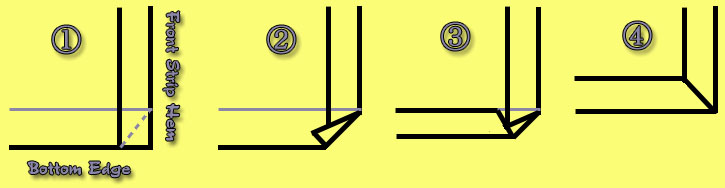
* Note: If you are using Western fabric, you will handle the back seam in one of three ways.
Mark the fabric according to which method you will use.
Note: The picture is not to scale. All measurements are in centimeters.
The picture illustrates how to flatten the seam with a kise. The red in the picture represents the seamline. First, with right sides still together, fold the edge of the fabric inward 0.2cm past the seamline. Press tightly to form a crease. Finally, carefully separate the two layers of fabric, leaving the bottom layer folded at the crease while flattening the top layer. Iron lightly.
Sew 0.2cm closer to the edge of the flap than the marked lines. Once the tuck is sewn, fold exactly on the mark so that the flap points downward and flatten as shown above, leaving the kise. Iron lightly, then sew by hand just below the seamline to hold in place, making 0.2cm stitches every 2cm.
Fold the fabric in half at the shoulder and pin the back panel to the front panel along one side, right sides together, making certain that the seamlines match up exactly. Start at the bottom edge and stop at the 15cm mark.
For extra strength under the arm, cut out two small squares of fabric 1cm on a side and pin the squares exactly over the stopping point, one on the front panel and one on the back panel. Sew along the seamline from the bottom edge to the center of the small squares, backstitching slightly at each end.
Flatten the seam toward the front, being sure to leave a 0.2cm kise, and iron lightly. Repeat on the other side.
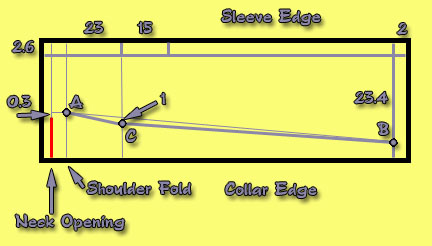
As can be seen in the picture, the edge should make a straight vertical line up the front panel side to the shoulder, curve over the shoulder, and then go straight down to the tuck on the back panel side. Once it reaches the tuck, it will slant inward until it reaches the bottom of the underarm opening.
Next, sew the upper (slanted) and lower (straight) layers of the seam allowance together along the solid yellow line, working 0.2cm from the edge. Again, make certain that you sew only the two layers of the seam allowance so that your stitches do not show.
Once this is done, proceed to hem the entire seam allowance down, starting at the bottom hemline. Use a stitch called a "selvage hem," working 0.2cm from the edge.
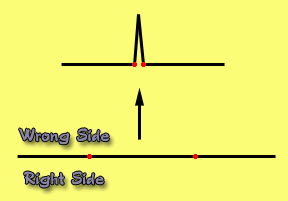
Below is a cross-section diagram of the selvage hem stitch. Most of the thread should be hidden in the space between the seam allowance and the body panel.
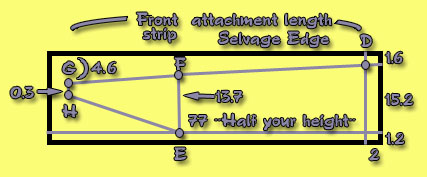
Before you cut the front strips, you may want to match the pattern. Since the yukata is worn with the left over the right, only the left side will be visible, so this is the side you want to match. Hold the "miscellaneous pieces" panel with the selvage edge against the front left body panel to see which way you think it matches best. When you are satisfied, mark this as the left front strip.
Note: The picture is not to scale. All measurements are in centimeters.
The full length of this panel depends on your height and how long you made the sleeves. You should have left at least 280cm.
First, cut the panel in half lengthwise, giving you two long, narrow panels. The one that you marked as the "left front strip" will give you the two front strips, and the other will give you the two collar pieces. Cut the front strip panel into two 140cm sections. (If there is leftover fabric, you can use it to make a matching handbag or other accessory.)
Note: If you have made alterations to the standard height, you will need to alter this number as well. The length of each strip should be 20cm less than the total length of the front body panel.
Cutting the collar will be done later.
Once the cut edge is hemmed, place the strip on the approprate front panel, right sides together. Match the mark connecting points D, F, and G to the line segment BC marked on the front panel and pin in place. Machine-stitch the length of the marked line.
When the seam is sewn, add a 0.2cm kise and flatten in the direction of the strip. Sew the seam allowance to the front strip using the selvage hem stitch.Marking the Front
Sewing the Body
With the panels right sides together, pin along the center back edge from the neck opening down to the bottom edge. Be careful not to rip the neck opening any wider. Sew along the 1cm seamline. For added strength, sew down the same length at a distance about 0.4cm closer to the edge than the seamline.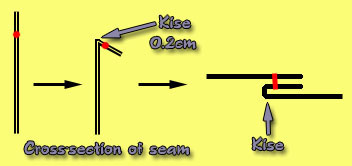
 If you cut the neck opening on the shoulder fold in the traditional fashion, leaving the bottom edges uneven, you now need to sew a tuck to take care of the extra flap of fabric. You should have a 4cm strip marked across the width of the panel. Bring the two marked lines together such that the flap protrudes toward the wrong side and pin in place.
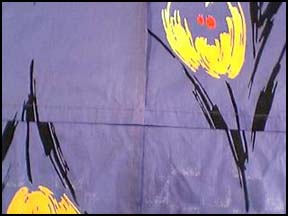 When finished, the center of the back should have two seams in the shape of a cross as shown.
Hemming the Body
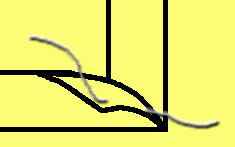
The side seam allowances will need to be sewn down to prevent them from flapping around loose. The sleeve holes must also be prepared for the attachment of the sleeves.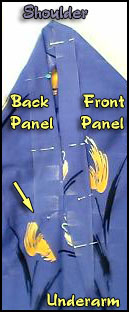 The first step is to pin the seam allowance to the body. Around the sleeve opening, flatten the seam allowance away from the opening. Where it crosses the tuck made earlier, indicated by the yellow arrow (left), spread it open. You may need to stretch the selvage edge a little to make the fabric lie flat. Leave a bit of give in the shoulder to prevent tearing when worn.
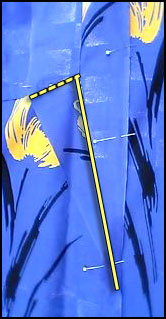 Once the seam allowance has been pinned in place, baste the slant where it crosses the tuck. When doing so, make certain that your stitches go only through the seam allowance and not the back panel. This is the dashed yellow line in the picture (right).
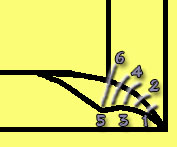
 Start with the needle between the seam allowance and the front panel. Bring the needle up through the two layers of the seam allowance. Dip the needle down through all three layers, then back up again through all three layers. Finally, dip the needle down through only the two seam allowance layers. Each of the stitches made should be 1-2mm in length. You should see two short dashes on the wrong side, with one short dash showing on the right side. Make the next cluster of stitches about 5cm from the first. When you get to the shoulder, make the stitches slightly closer together. Make sure you place one stitch directly on either side of the shoulder fold.
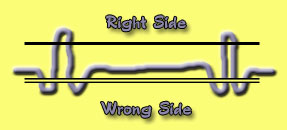
Cutting the Front Strips
If you are using a yukata roll, at this point you should have a large rectangle of fabric for "miscellaneous pieces." This will be cut into two front strips, the collar, and the collar reinforcement strip.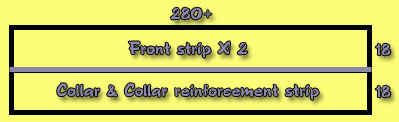
Marking the Front Strips
Attaching the Front Strips
For each strip, starting at about 4cm to the left of point E, fold the fabric to meet the marked line, then fold again at the line and pin in place. Hem down the length of the strip with stitches roughly 1cm apart. Use the same stitch as you did when hemming the sleeves.