Cameras Suck
My Guide To Outdoor Digital Photography
» preface
It should be noted that I know very little about photography and taking advice from me may be hazardous to your health. We aren't really talking about health here though so my belief that smoking is a great way to cleanse the body shouldn't be the cause of any controversy like it was when I gave that speech to a class of 3rd graders. This is just going to be a simple guide akin to those "X For Dummies" books, except that those books are actually written by people who know what they are talking about.
The focus will be on the things I have learned while taking pictures over the past few years, and the methods I use from shooting to editing. There will be no in-depth technical information on photography or photo editing, if you can turn your camera on then you are probably more advanced than me (I just start smashing buttons until I see something light up). I'm not so much trying to offer you advice on how you should take pictures, I'm just telling you how I do it, due to popular demand (3 people have asked). Yes, I realize they were probably just being polite.
If you see something that is totally wrong, please let me know by adding a comment or discreetly sending me an email.
Topics: equipment, lighting, composition, people, camera settings, editing, shooting, conclusion.
» equipment
There is no doubt that better equipment will result in better pictures (when used by someone who knows what they are doing), but unless you are trying to get your photographs into National Geographic magazine, you can probably save yourself the hassle of lugging around a bunch of expensive equipment. The lighting is the most important determining factor in how your picture will come out and no amount of fancy equipment will be able to overcome bad lighting (except perhaps filters, although I have never used them, I think they can make a big difference in some challenging lighting situations).
How you use your camera is much more important than what camera you have. First, get rid of any fantastic idea you may have in your head that you can just point your camera (no matter how much you paid for it) at something and it will produce a picture that exactly captures the scene. Cameras are far more limited than our eyes and they aren't automatically controlled by something as smart as our brains. You'll need to make an effort to take good pictures, your camera can't do it for you. If you're looking for an easier way, just buy postcards.
If you want to be able to zoom in on wildlife from afar or take super-close pictures of insects then you may need special equipment and I can't help you. But if you just want to take everyday, normal, wide-angle pictures then all you need is a decent compact digital camera. I often find myself shooting pictures under duress (hurried, tired, in extreme cold and/or wind, etc.), so spending lots of time messing with equipment or composing a shot would not be desirable.
Initially I used a Canon S110, then a Canon S410, then a Canon A620 (fell in river), then a Canon A710 IS, and now a Canon G9 (gift). Megan currently uses a Canon A710 IS. All are pocketable. Megan formerly used a Canon SD450 which is tiny and very convenient but it tended to produce blurry photos. In recent times, I have personally opted for getting slightly larger cameras which, in addition to generally producing sharper photos, also tend to have better manual control options and use standard batteries (cheaper, last longer, can be bought anywhere). "Image Stabilization" is a feature that is becoming more common on compact cameras and should help reduce blurriness. Cameras that save images in RAW format will give you more flexibility when you are doing post-processing, such as allowing you to tweak the exposure after the fact, but I have never owned a camera that shot RAW. I think I have heard that dealing with RAW files can be cumbersome, but I hear a lot of things that my therapist says don't exist. I mean don't get me wrong, it's not like I have conversations with trees on a daily basis or anything. Just periodically, I always let the tree start the conversation.
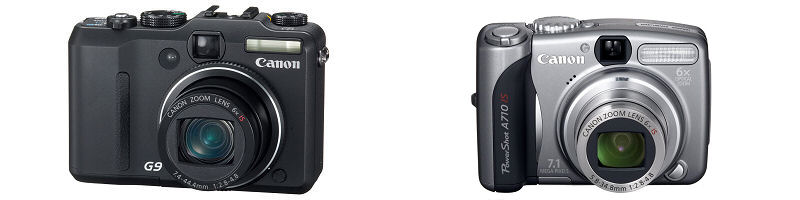
Left: My camera. Right: Megan's.
Older photos on this site may have been taken with any of the cameras shown below. The pace of technological progress makes most cameras obsolete in a few years, but compact cameras are also somewhat fragile, especially the lens mechanism. So, be careful of sand, dropping your camera onto concrete, or, something you may not have thought of, dropping it into a river. I have confirmed that all of these things can break a camera. Thankfully, when my G9 broke it was under warranty and Canon fixed it for free, within 2 days.

My camera graveyard: Canon S110, Canon S200, Canon S410, Canon S450, Canon A620.
Last time I checked, these sites offered excellent reviews and information on digital cameras:
Camera Recommendations
If I were buying a (compact) camera today (updated March 2012) I would buy: line of cameras. No camera is perfect and the smaller the camera you want, the less perfect it will most likely be. However, technology is progressing at a very rapid pace so the trade-offs are becoming less and less. Note that there are some things that are just physically impossible to
do with the small lens of a compact, such as have a very shallow depth of field (blur the background).
line of cameras. No camera is perfect and the smaller the camera you want, the less perfect it will most likely be. However, technology is progressing at a very rapid pace so the trade-offs are becoming less and less. Note that there are some things that are just physically impossible to
do with the small lens of a compact, such as have a very shallow depth of field (blur the background).
If I were buying a (compact) camera today (updated March 2012) I would buy:
-
Canon G1 X
(Expensive and a bit bulky to carry around but excellent image quality and low light performance)
-
Canon G12
(Less bulky than the G1 X with many of the same features for less money, although slightly worse image quality, especially in low light)
-
Canon PowerShot S95
/ Canon PowerShot S100
(Very compact and great image quality for the size, the main downside is that you cannot add things like an external flash or polarizing filter)
June 2012 Update:
I now own the
Canon G1 X
and have to say it is a really amazing camera, the quality of the photos blows my previous Canon G9 out of the water (in terms of clarity and amount of detail captured).
So, if you can handle the ~$750 price tag, the limitations of the lens (not good for macro), and the large size of the camera, it is my top recommendation by far. I am adjusting to things like not being able to fit my camera in my pants pocket and needing to carry a camera bag (this one is really cool if you don't want to look like a professional/tourist). Thus far I have mostly only gotten to use the camera for family photos but hope to do some landscapes soon.
» lighting
As mentioned previously, lighting is the key to a good photo. If you are shooting outdoors then you don't have much control over the lighting and if you are shooting indoors, then you are reading the wrong guide. Mornings and evenings are often said to be the best times to shoot which is generally true but just note that if you are not using a tripod, then the low light during these times can often lead to blurry pictures.
Even outdoors, you do have some control over the lighting. For instance, you can plan your hikes so that the lighting is optimal when you are taking pictures. Don't stress out too much about these things though and remove all enjoyment from your hike, like I do.
Sunny days may be nice to hike in, provided you put on enough sunscreen, but they can also be the most challenging to photograph. On a sunny day you are basically limited to photographing things with the sun at your back. Even then you may have to deal with harsh shadows and overly bright areas. On a cloudy day, you may be able to shoot in all kinds of directions because things are lit more evenly. However, sometimes a cloudy sky can remove too much contrast, and in effect, detail, from a scene. It all depends.
Unfortunately, bad lighting is more common than good lighting. To make the best of a bad situation, make sure your camera's exposure setting is set to capture the detail you care about and pay close attention to where you are pointing the camera (e.g. including a big bright sky will cause your foreground to be darker). Avoid including large dark shadowed areas along with overly bright areas as much as possible, your camera simply cannot handle the contrast and detail will be lost.
The below pictures show the same photograph taken in different lighting. The photo on the left was taken on a very overcast day, causing the colors to be vibrant. The photo on the right was taken on a sunny afternoon, causing lots of detail/color to be washed-out (a polarizing filter may have helped out in the second shot).
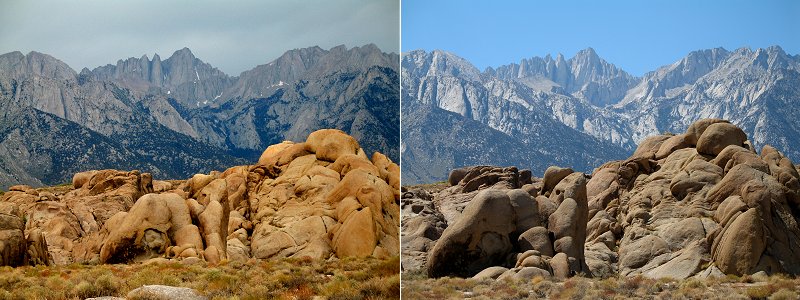
Mount Whitney, California.
» polarizing filter
One thing that can help out in bright sunlight is a circular polarizer. By blocking out reflected light (at certain angles)
a polarizer can lead to better saturated colors. The photo on the left was taken with a polarizer and the photo on
the right without one.
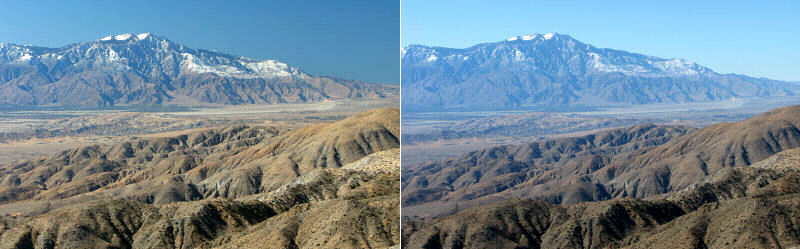
Joshua Tree National Park, California.
» composition
Composition is obviously an important part of creating a compelling photo. I'm not going to go into much depth on this topic because I'm sure it is already better documented elsewhere, but these are a few simple things I keep in mind while shooting.
The below pictures were taken from the same area at about the same time but the photo on the left has a far less interesting composition. In the photo on the right, note how the river runs diagonally from the foreground to the background, leading the eye to the sunrise. In the photo on the left, the sunrise is overpowered by a big blank area of sand which offers nothing interesting to the eye. In person, the view on the left was no doubt still impressive but all beautiful views do not automatically translate into a great photo. In short, just because you point your camera at something that looks cool in person, it doesn't mean you will end up with a good photo. You have to think about how it will look in 2 dimensions.
Composition is obviously an important part of creating a compelling photo. I'm not going to go into much depth on this topic because I'm sure it is already better documented elsewhere, but these are a few simple things I keep in mind while shooting.
- Look for diagonal lines. Diagonal lines are great for leading the viewers eye
into and around the photo.
- Minimize the amount of sky you include unless the sky is truly interesting.
Generally, there is nothing interesting about a blank blue sky so don't fill up
half the photo with it.
- Depth and scale can easily be lost in a picture, try to include things in your
pictures or shoot from angles that convey them. People are great for conveying
scale.
- The Rule of Thirds. Break up your picture into a grid of thirds and put objects/lines
along those boundaries (e.g. avoid putting the horizon right in the middle of your
picture, avoid putting objects in the dead center of your photo, avoid putting objects too close to the edges).
- Include something interesting in your foreground, and ideally, have it lead to
your background.
The below pictures were taken from the same area at about the same time but the photo on the left has a far less interesting composition. In the photo on the right, note how the river runs diagonally from the foreground to the background, leading the eye to the sunrise. In the photo on the left, the sunrise is overpowered by a big blank area of sand which offers nothing interesting to the eye. In person, the view on the left was no doubt still impressive but all beautiful views do not automatically translate into a great photo. In short, just because you point your camera at something that looks cool in person, it doesn't mean you will end up with a good photo. You have to think about how it will look in 2 dimensions.
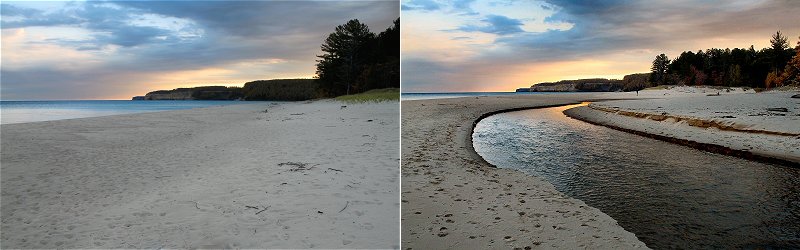
Miners Beach, Pictured Rocks National Lakeshore, Michigan.
» people
I try to avoid taking pictures of people just standing in front of things. It's generally more interesting to see someone doing something (skiing through powder, crossing a log over a stream, building a fire, hiking up a ridge, etc) than it is to see them standing in front of something, blocking the view. One reason to take pictures is to capture memories that would otherwise be forgotten, so pictures of the time you had to climb down a little cliff to filter some water may spawn more memories than the one of you standing in front of Mount Rushmore.
Try to keep people within the context of the entire environment rather than just showing half their body with some landmark in the background. Unless the person is a supermodel, or has amazing hair like I do, no one really wants to look at them that closely, except maybe their mom. For yourself, as good as you think you look now, chances are that in a few years you will be totally embarrassed about the clothes you are wearing, your hairstyle, or something else, so you're better off not making yourself the focal point of the photo anyway.
The photo on the left is one of my favorites because it captures the moment we first reached the edge of Zion Canyon after hiking through miles of forests and meadows. The photo on the right is me standing in front of the Mountain of the Sun, and that's fine too, but the inclusion of myself doesn't really add anything to the picture, it just proves I was there (not valid in a court of law).
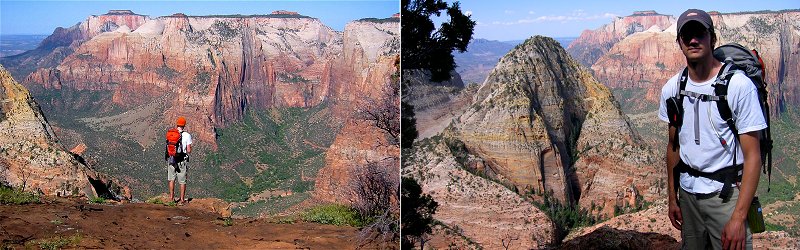
Zion Canyon from Deertrap Mountain, Utah. (Photos by Megan)
» camera settings
Different cameras offer different levels of adjustment and while your camera may do a decent job of picking settings in "auto" mode, you are best off knowing what they do and when to set them manually.
» exposure
The exposure setting determines how much light reaches the sensor. It is a combination of many settings and it is the one I use most. Bump the exposure down and your photo will come out darker, bump it up and it will come out brighter. In most lighting situations you are going to lose detail in shadows or highlights so the exposure setting just lets you choose which direction you want to lean in. Your camera will make a good guess at the optimal exposure but it doesn't know the difference between the sky and the ground so it may choose a setting that causes the sky to be washed out (so the foreground can be brighter) when you really wanted to capture the sky.
With my camera, I know that on a bright day I often need to bump the exposure down at least 1/3 step or bright details will be lost. If you are taking pictures in the winter that include lots of snow then you may have to bump the exposure setting up or the snow will turn out gray rather than white.
How do you know? Well, you can kind of tell how your picture will turn out by looking at the LCD but even in good light the LCD will be washed out and it will be totally useless in bright sunlight. So, you should turn on your camera's "histogram" function which will present you with a graph of the brightness of all pixels in your photo so you can see if the light or dark details are getting truncated.
For the left photo below I used the camera's default settings and you can see that the blue sky has been totally washed out. For the right photo I set the exposure setting to -1 which captured the blue sky, but also made the foreground a bit darker. The corresponding histograms are listed below the photos. In short, the height of the histogram indicates the number of pixels in the photo that have a certain brightness. Left to right the graph goes from dark (black) to light (white). So, the high spot on the far right of the left histogram corresponds to the amount of white in the photo and thus indicates the washed out sky. In general, you want the histogram to be pushed up near the right edge but not so far that it peaks unnaturally at the edge. Decreasing the exposure setting will move things to the left (darker) and increasing it will move things to the right (lighter).
» iso
The ISO setting determines the camera sensor's sensitivity to light. A higher ISO means a more sensitive sensor which allows for a quicker shutter speed. This is good for low light situations where a longer shutter speed would cause motion blur. The downside is that a higher ISO results in a noisier, less clear picture. I generally try to keep the ISO as low as possible.
Different cameras offer different levels of adjustment and while your camera may do a decent job of picking settings in "auto" mode, you are best off knowing what they do and when to set them manually.
» exposure
The exposure setting determines how much light reaches the sensor. It is a combination of many settings and it is the one I use most. Bump the exposure down and your photo will come out darker, bump it up and it will come out brighter. In most lighting situations you are going to lose detail in shadows or highlights so the exposure setting just lets you choose which direction you want to lean in. Your camera will make a good guess at the optimal exposure but it doesn't know the difference between the sky and the ground so it may choose a setting that causes the sky to be washed out (so the foreground can be brighter) when you really wanted to capture the sky.
With my camera, I know that on a bright day I often need to bump the exposure down at least 1/3 step or bright details will be lost. If you are taking pictures in the winter that include lots of snow then you may have to bump the exposure setting up or the snow will turn out gray rather than white.
How do you know? Well, you can kind of tell how your picture will turn out by looking at the LCD but even in good light the LCD will be washed out and it will be totally useless in bright sunlight. So, you should turn on your camera's "histogram" function which will present you with a graph of the brightness of all pixels in your photo so you can see if the light or dark details are getting truncated.
For the left photo below I used the camera's default settings and you can see that the blue sky has been totally washed out. For the right photo I set the exposure setting to -1 which captured the blue sky, but also made the foreground a bit darker. The corresponding histograms are listed below the photos. In short, the height of the histogram indicates the number of pixels in the photo that have a certain brightness. Left to right the graph goes from dark (black) to light (white). So, the high spot on the far right of the left histogram corresponds to the amount of white in the photo and thus indicates the washed out sky. In general, you want the histogram to be pushed up near the right edge but not so far that it peaks unnaturally at the edge. Decreasing the exposure setting will move things to the left (darker) and increasing it will move things to the right (lighter).
Ice Columns, Pictured Rocks National Lakeshore, Michigan.
» iso
The ISO setting determines the camera sensor's sensitivity to light. A higher ISO means a more sensitive sensor which allows for a quicker shutter speed. This is good for low light situations where a longer shutter speed would cause motion blur. The downside is that a higher ISO results in a noisier, less clear picture. I generally try to keep the ISO as low as possible.
» shutter speed
This setting of course determines how long the shutter is open (how long the sensor is exposed to light).
I never mess with this unless it is a night shot or I want to shoot a waterfall and create the blurry water effect. For that, a setting of
1/4 to 1/30 of a second is usually good and you need mild lighting conditions and a tripod. In brighter light, a neutral density filter is typically needed for such effects.
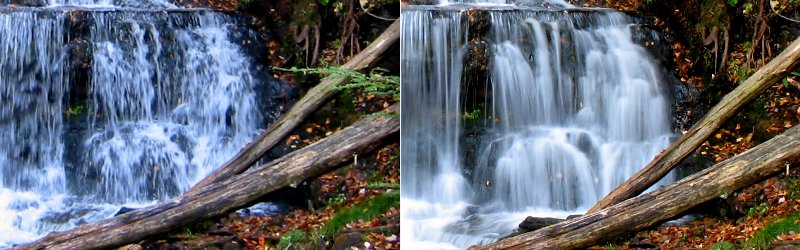
Wagner Falls, Munising, Michigan.
» aperture
The aperture setting determines how big the hole is that lets light through to the sensor.
This setting basically allows you to determine how much of your photograph is in focus
and can be used to achieve many artistic effects such as keeping your subject in focus while
blurring the background. The range of distances that are in focus is known as the "depth of field".
Unfortunately, with a compact camera you don't have a whole lot of flexibilty when setting the aperture, you really need an SLR camera with a big zoom lens. The one exception is macro shots. By putting your camera in macro mode and zooming in on your subject you can keep your subject in focus while blurring the background.
The photo on the left has a normal depth of field and in effect all of the flowers are in focus. In the photo on the right I have zoomed in on the butterfly (while in macro mode), which leads to a large aperture and a shallow depth of field. This makes everything that is not at the same distance as the butterfly to appear out of focus or blurry.
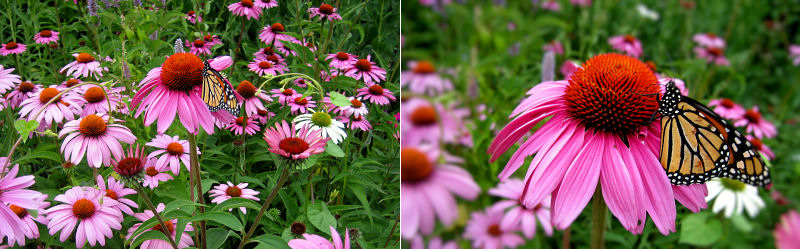
Botanical Gardens, Ann Arbor, Michigan.
» white balance
If you always leave your camera on "auto" white balance,
your photos may end up with an inaccurate color cast
in many lighting situations. "Auto" white balance will usually work pretty good
if your scene is lit by direct sunlight, but in other situations,
like an overcast day, a shady forest, sunrise, or sunset,
choosing the correct white balance can make a huge difference in your photo.
With outdoor photography, an incorrect white balance usually manifests itself
as your photo being too blue and it can be hard
to realize the problem without changing the white balance to see the difference.
What you generally want to do is look at a neutral colored object and make sure
it does not have a color cast (make sure white clouds are white, white snow is white, etc.)
You can fix this in a photo editor but that can degrade the quality
of your photo (unless it's in RAW format) so it's best to get it right at the time
you shoot the photo.
The photo on the left was taken with "auto" white balance at sunset on an overcast winter day. As you can see, when comparing it to the "fixed" photo on the right, it came out much more blue than it should have. Correcting the white balance is like lifting a haze from the photo, causing the natural colors to become much more distinct.
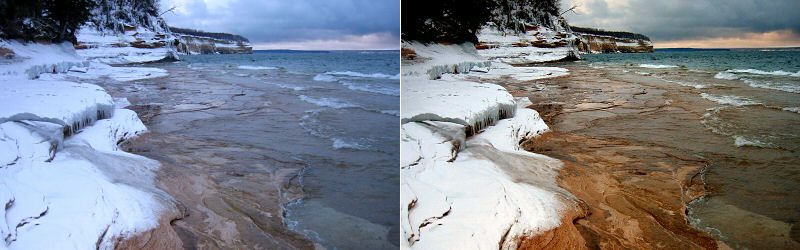
Pictured Rocks, Michigan.
» flash
You might be thinking what in the heck, this is a guide for OUTDOOR photography, what does the flash
have to do with this? Well, it turns out that the flash is good for more than just startling your
victims before you rob them, you can also use it to brighten your foreground when it is shadowed and
your background is bright. The most common situation would be if you are taking a photo of someone
standing in front of you and they are in bit of a shadow while behind them the scenery is bright
and sunlit. Without the flash their face would get lost in a dark shadow. With it, it might look
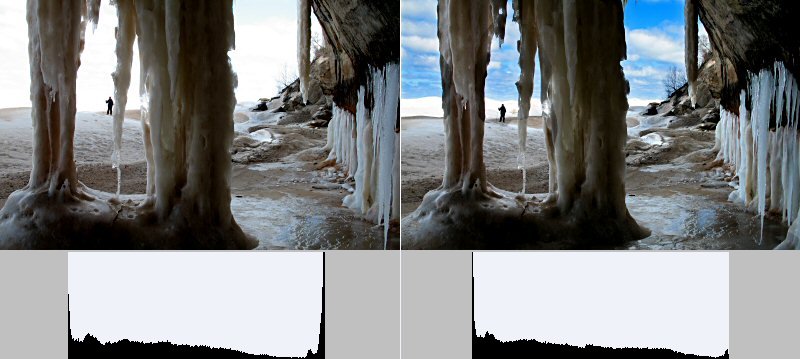
better, although flashes on compact cameras are generally pretty horrible. The photos below
were taken from a small dark cave. The one on the left was taken without a flash and the one on
the right with one. The flash makes it look a bit unnatural but it does bring out the color and
detail of the cave, if that's what you want. It's hard to see at this size, but my friend Kai
is climbing the ice column in the background.
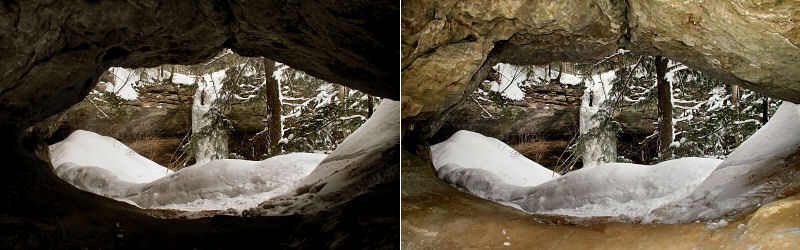
Munising, Michigan.
» zoom
Zooming is not just something to use when you can't get close to your subject,
it can also allow you to frame your subject in interesting ways by giving
a background object more prominance. Zooming can also allow you to shorten
the depth of field by lowering the aperture.
Note that zooming decreases the amount of light that hits the sensor so
it means you will have a longer shutter speed, lower aperture number, and/or
higher ISO setting which may adversely affect your photo (can lead to blur or
noise).
» editing
Photo editing allows you to make up for the flaws of your camera and/or your ability to use it. Kind of. If the lighting was so bad when you took your picture that it resulted in the loss of detail, such as a white sky or pure black shadowed areas, there is not much you can do to fix that. Also, excessive editing tends to degrade the quality of your photo so you are best off shooting in good light and picking the correct camera settings. Someday I will learn how to do this.
There are many photo editors you can use and most will offer a one step "make my photo look better" button which is always worth trying, sometimes it helps, sometimes it hurts. I use Paint Shop Pro to do all of my editing, it is much cheaper than Photoshop, but for what I am showing you here, pretty much anything should work.
As mentioned earlier, cameras that save images in RAW format will give you some more flexibility when you go to edit them, but I have no experience with RAW files.
» contrast adjustment
Assuming you shot your picture in good lighting, the easiest and quickest way you can improve your picture is by adjusting the contrast. Cameras, at least those I have used, tend to produce images that look washed out. By making the darks darker and the lights lighter you can bring out a lot of detail and create an image with more visual impact. The picture on the left is straight off the camera and the picture on the right has been adjusted with Paint Shop Pro. I simply used the Highlight/Midtone/Shadow tool, set Shadow to 30, and Highlight to 90. Note that the amount you can adjust these things without losing detail varies from picture to picture, you just have to play with it and see what looks best. Your photo editor may have various ways to adjust the contrast, read the documentation to see what options best suit your needs. Histogram Adjustment, Levels, and Curves are some more advanced tools you can use that will help you minimize the negative impacts of editing.
You can easily enhance the color of your photo by increasing the "saturation" but use this tool sparingly because it will degrade the quality of your photo and make it look unnatural. Often times just adjusting the contrast of your photo will result in more vibrant colors. Colors in nature tend to be vibrant so don't leave your photos looking washed out just because that is how they came off the camera. It can be helpful to make a mental note of the colors as seen by your naked eye so you can later make sure your photos are consistent with that.
The left photo is straight off the camera and the right photo has just had the contrast increased, no other alterations were made to the color.
It is often the case that you are taking your picture in bad lighting and some areas of your photo come out brighter than they should have and some areas come out darker. In these cases you are best off adjusting each area individually because if you adjust the whole photo at once you can't make the light areas darker without also making the dark areas darker and losing detail, etc. You can do this by using the selection tool in your editor to select a section of your photo for editing.
The left photo is directly off the camera and the right photo is the result of selectively increasing the brightness/contrast of the cliffs and darkening the sky (after removing the color cast). Note that the overall brightness of the picture could not be increased because it would totally wash out the sky. Be careful with your selections/adjustments though or you will end up with halos or unnatural looking transitions between the independently adjusted areas.
Any decent photo editor will offer a "sharpen" option and if you resize your photo, you should use it. Using the "Unsharp Mask" is a more complicated but recommended way to sharpen your photos.
» stitching
For a long time I avoided stitching because it seemed like it would be a pain to do or require a tripod. I was wrong on both counts. I'm sure a tripod is ideal but it's not necessary and the process of creating a panoramic picture from multiple frames can be done automatically with software that came with your camera. So if you come across a scene that you can't fit all in one shot, be sure to switch your camera into panoramic mode and take as many shots as you need.
The left photo shows the best I could do with a single shot, and the right photo was stitched together from 3 vertical shots.
I rarely print out my photos but I just wanted to make the point that what you see on your screen may not exactly match what you see when you get prints made, especially if you are using an LCD monitor.
» saving
So you've adjusted your photo, now all you need to do is click "save" and you're done, right? Not exactly. First, I would recommend that you never overwrite your original. Second, if you are putting your photos on the web then you probably want to compress them so they are quicker to download. The downside to this is that the compression will degrade the quality of your photo. So, you have to strike a balance but the choices you make can have a large effect on how crisp your photo looks. Different programs offer different options when you save an image as a jpeg but you will always have a "Compression/Quality Factor" option which is self-explanatory. You may also have a "Chroma Subsampling" option, and for low resolution images as you might display on a website, you should disable this (it will cause your photo to look blurry).
» ethics
How much editing is too much? I don't know, but the idea that editing is somehow cheating and always leads to something less accurate than a picture taken directly off the camera is kind of absurd. Cameras often do a bad job of capturing reality, especially if you are like me and don't know how to use them. Even Ansel Adams adjusted his photos in the darkroom. Ansel Adams, dude. No picture is going to be 100% accurate no matter what you do, cameras suck too much.
Photo editing allows you to make up for the flaws of your camera and/or your ability to use it. Kind of. If the lighting was so bad when you took your picture that it resulted in the loss of detail, such as a white sky or pure black shadowed areas, there is not much you can do to fix that. Also, excessive editing tends to degrade the quality of your photo so you are best off shooting in good light and picking the correct camera settings. Someday I will learn how to do this.
There are many photo editors you can use and most will offer a one step "make my photo look better" button which is always worth trying, sometimes it helps, sometimes it hurts. I use Paint Shop Pro to do all of my editing, it is much cheaper than Photoshop, but for what I am showing you here, pretty much anything should work.
As mentioned earlier, cameras that save images in RAW format will give you some more flexibility when you go to edit them, but I have no experience with RAW files.
» contrast adjustment
Assuming you shot your picture in good lighting, the easiest and quickest way you can improve your picture is by adjusting the contrast. Cameras, at least those I have used, tend to produce images that look washed out. By making the darks darker and the lights lighter you can bring out a lot of detail and create an image with more visual impact. The picture on the left is straight off the camera and the picture on the right has been adjusted with Paint Shop Pro. I simply used the Highlight/Midtone/Shadow tool, set Shadow to 30, and Highlight to 90. Note that the amount you can adjust these things without losing detail varies from picture to picture, you just have to play with it and see what looks best. Your photo editor may have various ways to adjust the contrast, read the documentation to see what options best suit your needs. Histogram Adjustment, Levels, and Curves are some more advanced tools you can use that will help you minimize the negative impacts of editing.
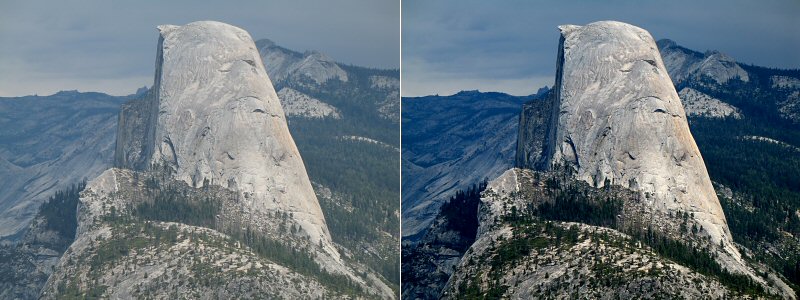
Half Dome, Yosemite, California.
You can easily enhance the color of your photo by increasing the "saturation" but use this tool sparingly because it will degrade the quality of your photo and make it look unnatural. Often times just adjusting the contrast of your photo will result in more vibrant colors. Colors in nature tend to be vibrant so don't leave your photos looking washed out just because that is how they came off the camera. It can be helpful to make a mental note of the colors as seen by your naked eye so you can later make sure your photos are consistent with that.
The left photo is straight off the camera and the right photo has just had the contrast increased, no other alterations were made to the color.
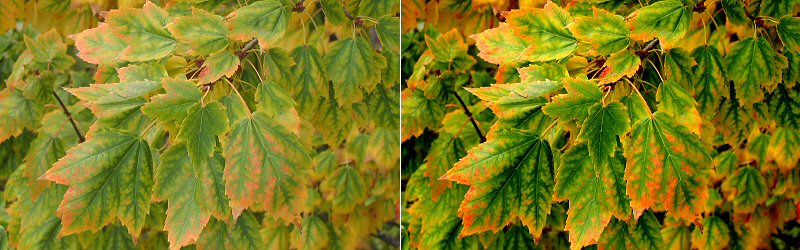
Maple leaves in fall, Michigan.
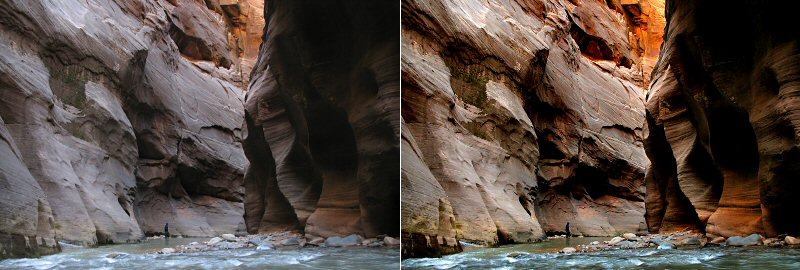
Megan in the Narrows, Zion National Park, Utah.
It is often the case that you are taking your picture in bad lighting and some areas of your photo come out brighter than they should have and some areas come out darker. In these cases you are best off adjusting each area individually because if you adjust the whole photo at once you can't make the light areas darker without also making the dark areas darker and losing detail, etc. You can do this by using the selection tool in your editor to select a section of your photo for editing.
The left photo is directly off the camera and the right photo is the result of selectively increasing the brightness/contrast of the cliffs and darkening the sky (after removing the color cast). Note that the overall brightness of the picture could not be increased because it would totally wash out the sky. Be careful with your selections/adjustments though or you will end up with halos or unnatural looking transitions between the independently adjusted areas.
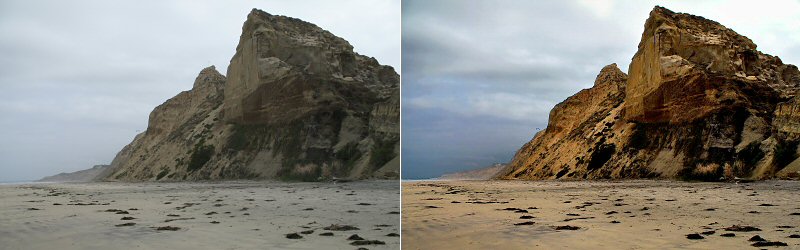
Ocean cliffs at low tide, La Jolla, California.
Any decent photo editor will offer a "sharpen" option and if you resize your photo, you should use it. Using the "Unsharp Mask" is a more complicated but recommended way to sharpen your photos.
» stitching
For a long time I avoided stitching because it seemed like it would be a pain to do or require a tripod. I was wrong on both counts. I'm sure a tripod is ideal but it's not necessary and the process of creating a panoramic picture from multiple frames can be done automatically with software that came with your camera. So if you come across a scene that you can't fit all in one shot, be sure to switch your camera into panoramic mode and take as many shots as you need.
The left photo shows the best I could do with a single shot, and the right photo was stitched together from 3 vertical shots.
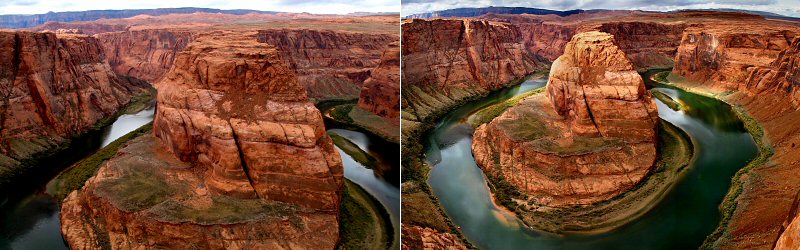
Horseshoe Bend, Glen Canyon, Arizona.
I rarely print out my photos but I just wanted to make the point that what you see on your screen may not exactly match what you see when you get prints made, especially if you are using an LCD monitor.
» saving
So you've adjusted your photo, now all you need to do is click "save" and you're done, right? Not exactly. First, I would recommend that you never overwrite your original. Second, if you are putting your photos on the web then you probably want to compress them so they are quicker to download. The downside to this is that the compression will degrade the quality of your photo. So, you have to strike a balance but the choices you make can have a large effect on how crisp your photo looks. Different programs offer different options when you save an image as a jpeg but you will always have a "Compression/Quality Factor" option which is self-explanatory. You may also have a "Chroma Subsampling" option, and for low resolution images as you might display on a website, you should disable this (it will cause your photo to look blurry).
» ethics
How much editing is too much? I don't know, but the idea that editing is somehow cheating and always leads to something less accurate than a picture taken directly off the camera is kind of absurd. Cameras often do a bad job of capturing reality, especially if you are like me and don't know how to use them. Even Ansel Adams adjusted his photos in the darkroom. Ansel Adams, dude. No picture is going to be 100% accurate no matter what you do, cameras suck too much.
» shooting
Here are a few simple tips to keep in mind while you are taking pictures:
1. Keep your camera STILL. Moving your camera, especially in low light, will result in blurry pictures. If the light is really low and you don't have a tripod, look for natural ones, such as rocks.
2. Adjust the exposure setting based on the lighting. How you need to adjust the exposure will vary by camera and situation. For more information on the exposure setting, read the exposure section above.
3. If you are taking your photo in anything but direct sunlight, you might want to choose a white balance setting that produces the most accurate colors.
4. Take lots of pictures, things don't always turn out how you expect them to.
» conclusion
I hope that I have now convinced you that your camera is your enemy, not your friend, and that it is hell-bent on messing up your photos. In order to take a good picture you must struggle against the limitations of your camera and carry a rabbit's foot with you at all times. Okay not really, cameras are great, I'd forget everything I've ever done without them. So, enjoy your picture taking.
I hope that I have now convinced you that your camera is your enemy, not your friend, and that it is hell-bent on messing up your photos. In order to take a good picture you must struggle against the limitations of your camera and carry a rabbit's foot with you at all times. Okay not really, cameras are great, I'd forget everything I've ever done without them. So, enjoy your picture taking.
Copyright 1995- Lars Jensen | randomspace@umich.edu |