Creating KML From a Spreadsheet
Do you need to create and maintain dozens of placemarks? Want a clean, attractive balloon design without editing any HTML?
This tutorial shows you how to enter data in a spreadsheet and then
generate a set of placemarks for that data in Google Earth. When you
want to update your placemarks, you simply update the spreadsheet and
generate a new KML file. This tutorial provides a sample spreadsheet
and instructions for entering your own placemark data.
Why Use Spreadsheets?
Spreadsheets
and KML are both ways to represent complex information. Many people are
comfortable with the way that spreadsheets work, so why not use them to
create KML? Using cell formulas it's possible to create a full KML file
from a spreadsheet's contents.
Here are just a few reasons to use Google Spreadsheets for your KML projects:
- Web-based, collaborative editing allows your team to simultaneously enter data and instantly publish updates to Google Earth.
- Managing your data in a spreadsheet keeps your content organized, portable and easily accessible.
- As
your project grows, it will be easier to transfer your content to a
database and use more robust methods of KML generation, such as dynamic
generation through scripting programs.
This
technique works best for structured data that fits well in spreadsheets
- basic lists. Here are just a few examples of kinds of data you could
adapt this technique for:
- Creating a map of your offices, clinics, or shelters
- Keeping track of your volunteers and their contact information
- Showcase your organizations project sites
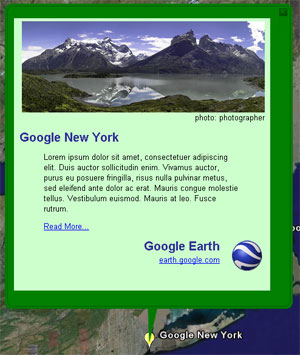
 Download this KML of Google's domestic offices for a live example of placemarks generated from a Google Spreadsheet. Download this KML of Google's domestic offices for a live example of placemarks generated from a Google Spreadsheet.
Open the Starter Spreadsheet
To begin, open the starter spreadsheet.
If you're not already signed in to your Google Account, you'll be asked
to do so. Once signed in, you'll see a spreadsheet that you can edit.
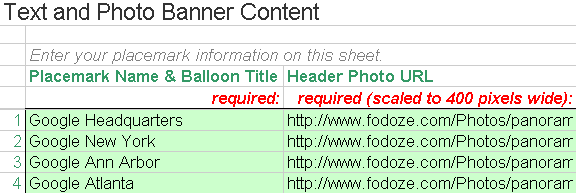
Edit the Spreadsheet
- On the Template
sheet, in the Required Information section, replace the sample data
with your own information. This will become part of the template for
each placemark you create.
- On the Template sheet, you can optionally change the placemark icon and border, background, and
text colors at any time.
- On the Placemarks sheet, replace the sample data with your own information for individual placemarks.
There is space for up to 100 placemarks.
Preview the KML
- Click the Publish tab at the upper right.
- Click Publish Now.
- Check "Automatically re-publish when changes are made"
- From the What parts? menu, select Sheet kml(!) only.
- Click Re-publish document.
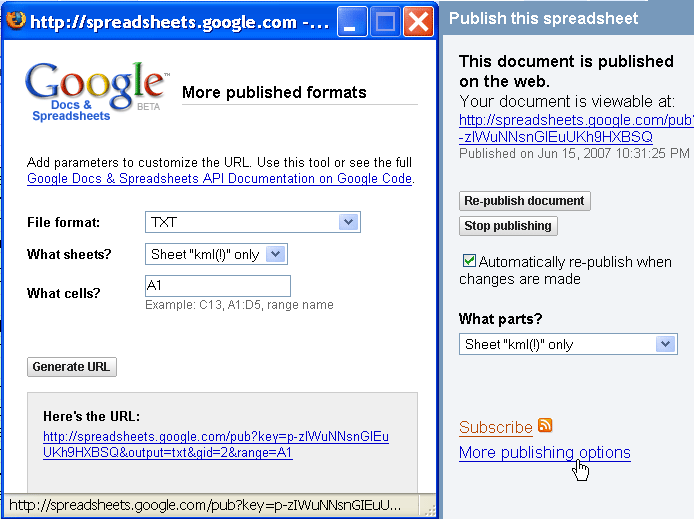
- Click More publishing options at the bottom of the Publish tab.
- In the pop-up window, select:
- File format: TXT
- What sheets? Sheet "kml(!)" only
- What cells? A1
- Click Generate URL.
- Copy the generated URL from the Address field, and then launch Google Earth.
Display Your Placemarks in Google Earth
- In Google Earth, select Network Link from the Add menu.
- In the Google Earth - New window, enter a name for the network link, paste the URL into the Link field, and click OK.
Google Earth loads your KML from the published spreadsheet and displays your placemarks.
Publish Your Changes
Whenever you make changes to the spreadsheet, click Re-publish document
on the Publish tab. Then reload the Network Link folder in Google Earth
you created in the previous step by right-clicking it and selecting Refresh from the context menu.
Discussion / Feedback
Have questions about this tutorial? Want to give us some feedback? Visit the Google Earth Outreach Discussion Group to discuss it with others.
What's Next?
Want
to test out your new skills? Check out this tutorials that shows you
how to use spreadsheets to add Time Stamps and Spans to your
placemarks!
|