Underwater Navigation Practice
by
Larry "Harris" Taylor, Ph.D.
This web article (extracted from the author's specialty course in navigation) deals only with underwater navigation using the compass. It represents some of the exercises used by the author in training divers to navigate. This material is copyrighted and all rights retained by the author. This article is made available as a service to the diving community by the author and may be distributed for any non-commercial or Not-For-Profit use.
All rights reserved.
Go To: Home About "Harris" Articles Slides War Stories Editorials Links Fini
Navigation is the art of safely moving from one location to another. The term navigation is derived from the Latin navis (a ship) and agere (to direct). To navigate between two points, the navigator must know:
1. Present position
2. Intended destination (both distance and direction)
3. Environmental factors (wind, current, underwater obstructions) that may alter the actual path that is traveled between origin and destination
All navigational techniques have errors that will influence the path taken between origin and destination, so navigation can be viewed as a process of perpetual checking for errors and continually re-evaluating both the diver's position and direction of travel.
When navigating between 2 points, divers need to estimate the traveled distance. Typically, this is done with either time or "kick-cycles." One kick-cycle is a downward movement of one leg. So, for each time the diver kicks with both left and right leg, a single kick-cycle is counted. This kick-cycle will vary with diver experience (less-vertical orientation in the water), anxiety, equipment weight, equipment configuration changes (especially fins), the diver's kick efficiency, diver's swim speed, thermal protection (various suits offer different amounts of drag), and the level of diver physical fitness. So, when navigation is critical, it is best to determine kick-cycles with each major change in diver configuration.
Kick-cycles are typically determined by swimming a measured distance (usually 100 feet or 30 meters). This is done as a buddy team; the diver counts the number of kick-cycles to swim the measured distance, while the buddy measures the time taken for the swim. This determination is done a number of times (three is typical) and the results averaged. Divers routinely diving in areas where floats are towed, will find that kick-cycles will change with and without the the towed object.
At the end of the swim-the-measured-line-exercise, the diver will know:
number of kick-cycles needed to travel a measured distance
average distance traveled per kick (distance of measured line / number of kicks)
average time taken to travel the measured distance
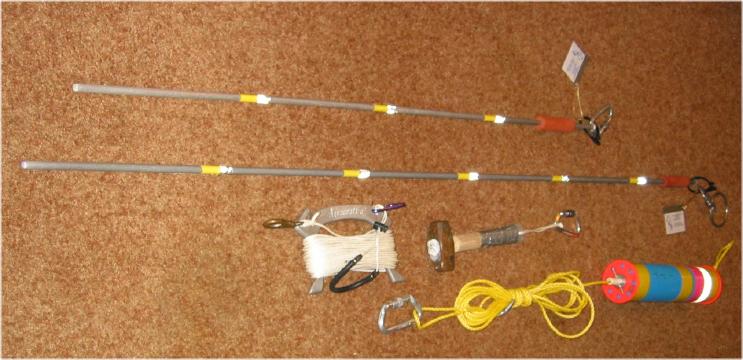
Any measured distance will suffice. In class, I use the system shown below (which is a bit more than minimum needed):
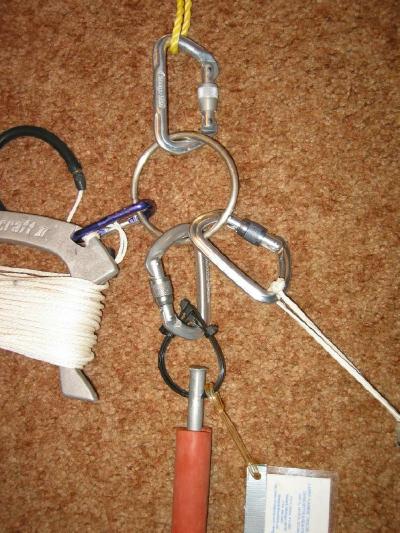
Basically, this is a set of 2 1/2" aluminum rods (one ~ 6' and one ~ 3.5') that also are used for ranges (as in Near Shore Mapping or, with lights attached, for marking an exit during a night dive), a marked (see below for marking code) 100' line (that is attached to one aluminum pole with a brass clip and then completely unrolled to be anchored at the second pole.) For increased visibility, my poles are marked at 1 foot intervals with yellow duct tape and 3M total reflectance tape. A piece of vacuum tubing serves as a hand-hold to stabilize the rod when it is pounded into the bottom. We typically use a small sledge-hammer to drive the aluminum rod into the bottom. Since the line maybe in the water for extended periods, each rod has a laminated copy of my business card (with request not to remove the apparatus on the back). Finally, to facilitate finding the line, a small Swim Noodle with 25" line (or longer, dependant on the work site) can be attached to the rod with a locking carabineer. (I find the combination of eye-splice and locking carabineer to be both convenient and reliable in underwater activities.) This same set-up can be used as an underwater baseline for base-line based search operations. In this case, a float on each end of the line allows accurate location of the line by surface support.
To facilitate attaching objects to the rod, three black polypropylene cable ties (black ties are preferred since the white nylon cable ties absorb water and become brittle), a locking carabineer and a large welded stainless steel ring are attached to the longest rod. This way, float, hammer, line, and other objects can be attached and easily removed in any order.
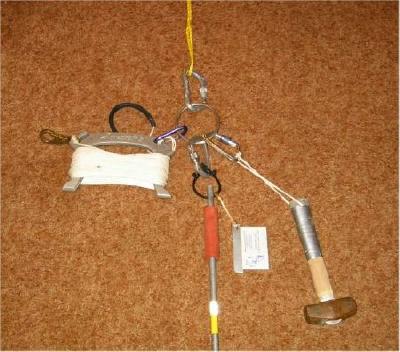
A carabineer on the shorter pole allows a convenient place to store the hammer once the second pole has been driven in the ground. The two poles can be held together during transport from the surface to the work-site with the carabineer on the small pole secured to the large ring on the larger pole.
A close-up of the stainless steel ring is shown below.
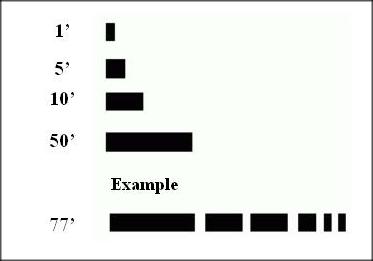
Finally, my underwater working lines are all marked at 1 foot intervals. While not accurate enough for survey work (Surveyor tapes are used for more rigorous measurements), they do provide a reasonable "guesstimate" (especially in overhead environments) of the amount of line deployed. We use a single line at every foot, a longer line every 5 foot, a still longer line (one for every 10 feet) to mark the 10' interval and a much longer line to mark the 50' mark. The code is shown below
While this collection of gear is certainly more elaborate than a single, simple line, this assembly of objects does have multiple uses and, more importantly, the set-up and take-down procedures provide practice in team work and conducting underwater operations.
The Diamond Course
Navigation skills, like any physical activity or sport, require practice. Below is the course I use in navigation training. Basically, it is an augmented diamond. This course is assembled by the divers as part of a combined navigation/search & recovery class. While the set-up of the course has little to do with navigation, it does, again, promote team-work and practice in developing in-water problem solving abilities.
|
|
 |
Since a common error in training is to swim a bearing until stopped, it is important that training include known distances. So, the diamond shaped course is set-up such that the first and last legs of the course have an in-water measured distance of 100 feet. Since students know the number of kicks needed to travel 100 feet, the practice protocol is to swim 10% more than the required number of kick-cycles for the known 100' distance. If the marker buoy has not been sighted by this time, the divers surface and move to the buoy for the next leg of the course. (Example: If a diver takes 30 kicks to swim the measured 100', then the practice swim is stopped at 33 kicks.) Limiting the practice swims to 10% over the estimated number of kick cycles minimizes the time spent swimming past a missed target. So, the majority of in-water time is spent navigating, as opposed to swimming after a diver who continues to swim past the mark or swimming on the surface back to a missed training target. This procedure also conserves air, since the underwater time is mostly swimming a navigation course.
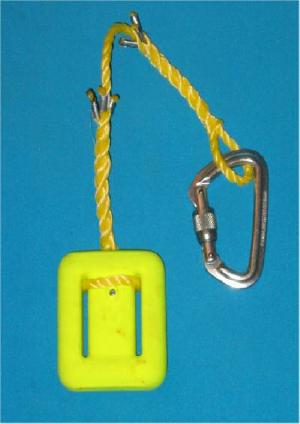
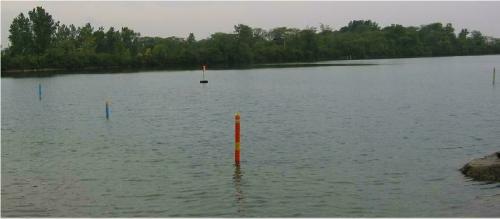
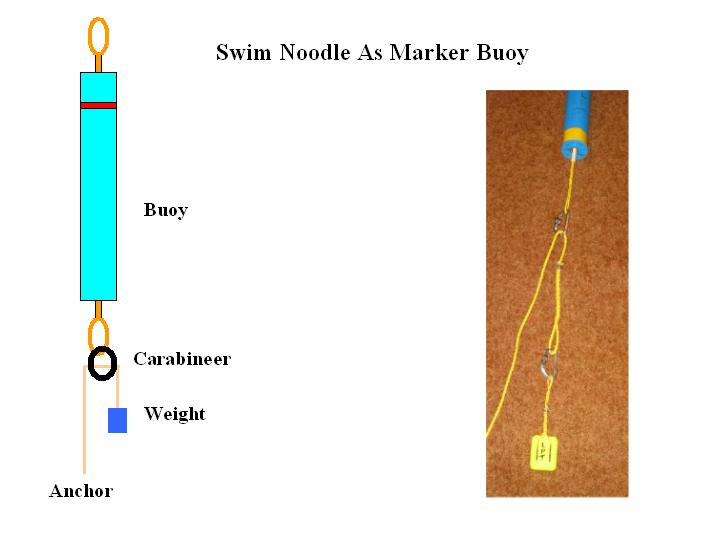
The students set the buoys (Swim Noodles). We use swim noodle marker buoys since they remain upright in the same position. This allows one bearing determination for each leg to remain valid during the day. If the marker buoy is not directly over the anchor point, then the marker position (and the bearing needed to swim to it) can shift with wind/current changes. To keep the marker buoy upright, we use 2 weights. The primary weight is a 15 pound anchor (which would be attached via an eye-splice/locking carabineer) on the line at the left-most line (below left). The yellow (for increased underwater visibility) anchor line is then threaded through a locking carabineer which has been attached to the swim noodle. After passing through the swim-noodle-carabineer (which then functions as a pulley), the anchor line is attached with locking carabineer-eye-splice to a 4-pound tensioning weight (below right). When deployed, the tensioning weight keeps the buoy in an upright position directly over the anchor.
 |
|
|
|
|
Tension Weight |
The swim noodle marker buoy is assembled prior to setting up the course.
The students measure the first and last legs of the course to be exactly 100 feet: One student remains at the start point marker buoy (shallow enough for this diver to stand firmly on the bottom) and the buddy, using a 100' marked line, swims out until the100 foot line is totally deployed. To facilitate the process, the anchor (via locking carabineer) is attached to an inflated lift bag. When the designated 100' distance is reached, the secondary weight is dropped. Then the lift bag is inverted, the air inside the bag escapes, and the primary anchor sinks to the bottom. (When it comes time to disassemble the course, each anchor can be raised with its attached lift bag.) This results in a two legs (first and last) of a diamond shape that are known to be 100 feet.
While the students are deploying their markers, I swim the outer most marker and set it to approximate a diamond shape. This marker is a large inner tube with a diver's flag on a 6' pole. The dive flag pole has a small swim noodle covering marked with colored and reflective tape for enhanced visibility. The anchor line for this marker is marked at random intervals (6-10 feet) with colored duct tape.
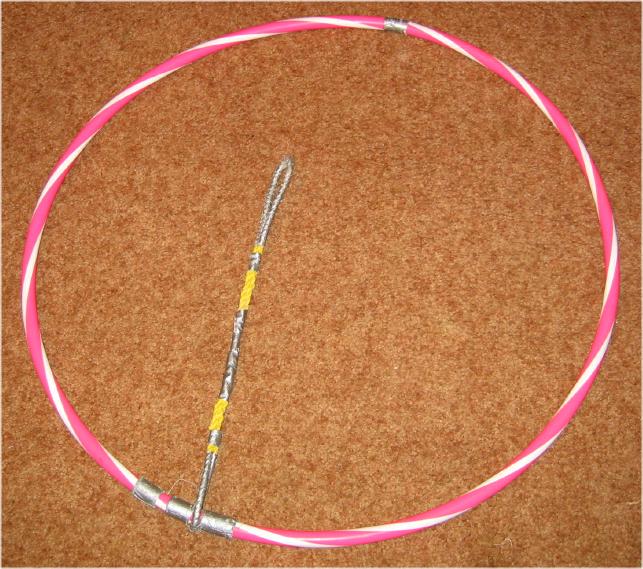
Since navigation requires good buoyancy control, after the course is assembled, the first exercise of the day involves using a hula-hoop on the marked anchor line of the dive flag marker. Basically, the students hold the hula-hoop at chest level and, as a group, move up and down the line, stopping at the anchor line marks and holding it steady. This simple exercise rapidly promotes acquisition of buoyancy control skills, especially in a team-work situation.
 |
 |
| The hula hoop | The buoyancy exercise |
Finally, a "first swim" swim noodle marker is set along the first course leg. Each student's first swim is directed towards the "first swim" buoy. During this swim, I swim above them to check out their compass orientation to make certain their lubber line is aligned with their body. This is critical since a non-alignment of compass and body makes navigation most difficult. (This alignment can only be seen by another diver swimming on top of the navigator.) Also, hitting the mark on a short swim instills confidence for the longer swims of the full course. After every student does this short swim, the "first swim" buoy is removed from the course
After the "first swim," each student sights a bearing from the "start" buoy to the first leg of the diamond. Then, as a buddy team, they swim underwater towards the first marker; one buddy navigates, the other buddy is primarily a look-out for the marker. If the marker buoy is not sighted by swimming 10 % past the navigator's number of kick cycle's for 100 feet, the team surfaces, moves to the buoy and takes a bearing for the second marker. (Here the distance is not measured, so navigator has to estimate kick-cycles). This exercise is repeated until all of the bearings between markers have been recorded on each diver's slate. Once all of the bearings have been recorded, then the divers repeatedly circle the course with divers alternating the navigator/look-out role on each leg.
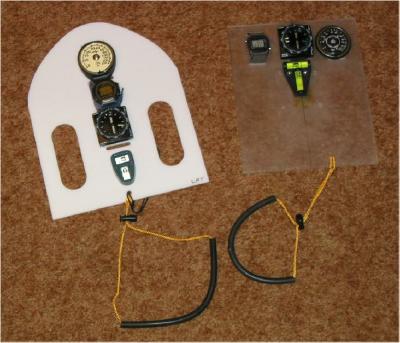
After success with their compass configuration, divers are given an opportunity to navigate with a compass board. These vary with style and expense, but they are basically compass, depth gauge, timing device and level on a single platform. Most compass compass boards are home-made. Typically, compass boards are used when high levels of accuracy are required.
By the end of the exercise, students typically circle the course without surfacing. The last exercise with this course is its disassembly. Students swim the course underwater and, at each marker buoy anchor line, the anchor is raised using the attached lift bag and a separate air source. Someone swims on the surface above the divers and collects the surfaced components.
The Straight Line Practice Course
The above diamond course involves substantial investment in time and expense. A much simpler, less expensive, and more easily deployed course is a simple straight line. This course is derived from the Boy Scouts of America orienteering practice Compass Game. In this surface game, each contestant is given three bearings and distances to walk. The course begins at one of several designated marks along a straight east-west line. After walking three consecutive distances and bearings, the navigator returns to a mark on the starting line. Points are assigned based on distance between arrival point and the correct target. I have applied this principle to a course useful for practicing with a diver's compass. The course, although designed to be set up along shore, can also be deployed underwater using a 100' (or any distance) marked line.
Laying this course (or a smaller segment) along shore provides a simple means for a diver buddy to practice their navigation without enormous commitments of time and expense. Since the course is on shore, it is easy to deploy and retrieve. Basically, the surveyor's tape is laid along shore along a magnetic east-west line or north-south and marked every 5 feet with game cones. I start with cone number 0 at the zero point of the tape and end with 21 and the 100 foot mark.
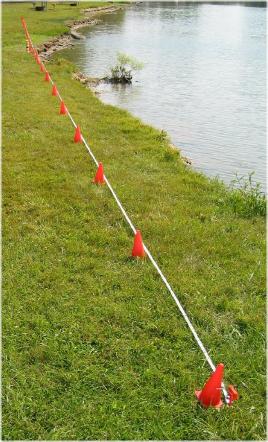

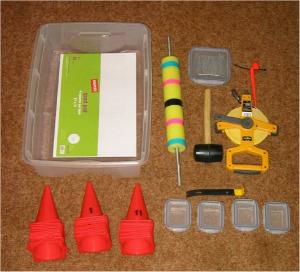
Basically, the course is a simple straight line with marks every 5 feet. Although 100 feet is the designed length, for individual practice, a shorter length will work. I mark my 5 foot intervals with small "game cones" used to mark outdoor athletic field boundaries. I add vinyl numbers to each of the cones to designate starting and ending points. In the center of the course, I add a taller mark (in my case, a 14" swim noodle around a 1/2" aluminum rod). All components, (100' Surveyor's Tape, Game Cones, Center Marker, Hammer and Deck Nails to anchor, if needed, the cones, a small pry bar to remove cone anchors, small cases to store direction cards, plotting paper), and the storage case, can be purchased for less than $60.00. The simplest version, only surveyor's tape and cones, can be obtained for less than $30.00.
 |
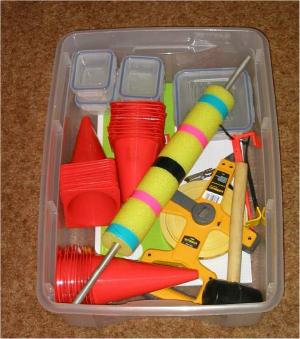 |
| Components | Packed for storage & transport |
Once the course is established, then divers swim three-legs, such that the final leg is intended to land on the starting line. The larger marker is used as a landmark: diver's establish a sighting to this mark from any in-water location, submerge and swim towards the mark. The advantage of this course is that all practice courses end with a swim towards shore or the starting line. So, missing the mark still ends with divers near shore, as opposed to swimming beyond the mark into deeper water.
The actual courses to be run can be determined using large size plotting (graphing) paper, a set of dividers, and a plotting protractor.
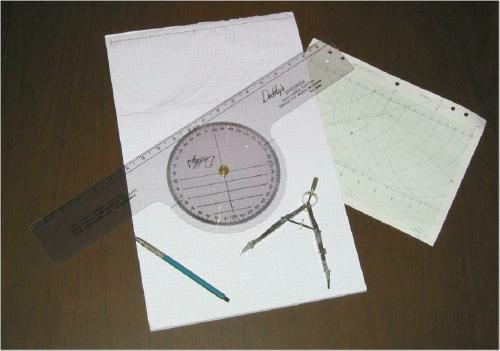
Although the actual course can be set at any bearing, the simplest is to set the course on a line corresponding to magnetic North-South or magnetic East-West. If this is done, then some of the following hand-plotted courses may be used.
Using an east-west line with divers swimming south of the line:
Reciprocal Practice
Start at any marker, and then swim
180o for 50' (or any distance)
0o for 50' (same distance as outbound)
Destination = Starting Marker
Two-leg Practice
| First Leg |
Second Leg |
|||||
| Start | Bearing (o) | Distance (') | Bearing (o) | Distance (') | Finish | |
| 2 | 180 | 50 | 035 | 61 | 08 | |
| 2 | 180 | 50 | 045 | 75 | 12 | |
Three-leg Practice
| First Leg |
Second Leg |
Third Leg | |||||||
| Start | Bearing (o) | Distance (') | Bearing (o) | Distance (') | Bearing (o) | Distance (') | Finish | ||
| 2 | 135 | 50 | 45 | 33 | 360 | 12 | 12 | ||
| 17 | 180 | 70 | 300 | 40 | 20 | 46 | 13 | ||
Additional values can be determined using graph paper, a protractor and a compass as described above.
Navigation, like all physical skills, requires practice. Swimming with known bearings and distances facilitates acquisition of navigation skills.. Hopefully, the above information will provide assistance for divers to practice the art of underwater swimming from one location to another,
Acknowledgement
Thanks to the friendly folks of Portage Quarry, Ohio for providing me a place to practice and teach the art of navigation.
Go To Site Page: Home About "Harris" Articles War Stories Editorials Links Fini
About
The Author:
Larry
"Harris" Taylor, Ph.D. is a biochemist and Diving Safety Coordinator
at the University of Michigan. He has authored more than 200 scuba related
articles. His personal dive library (See Alert Diver, Mar/Apr, 1997, p. 54) is
considered one of the best recreational sources of information In North America.
All rights reserved
Use of these articles for personal or organizational profit is specifically denied.
These articles may be used for not-for-profit diving education