
River Diving Equipment
by
Larry "Harris" Taylor, Ph.D.
This is an
electronic reprint and expansion of a portion of a three part series on river diving that
appeared in SOURCES (Mar/Apr.
1990, p. 36-40.). This material is copyrighted and all rights retained
by the author. This article is made available as a service to the diving
community by the author. This article may be distributed for any non-commercial
or Not-For-Profit use.
All rights reserved.
Swift water river diving can be extremely hazardous. Although knowledge from reading may assist the diver’s understanding of the environment in which the diver has chosen to play, there is no substitute for proper training. River diving is a specialty that demands techniques and equipment beyond most recreational training.
Go To: Home About "Harris" Articles Slides War Stories Editorials Links Fini
River diving, as with all specialty environments, requires equipment tailored for the unique characteristics of the region in which the diver has chosen to work or play. Often, this can be accomplished with minor modifications of commonly used diving gear. Some of our apparatus is useful only in the swift water of an inland waterway. The primary factor in choice of gear is the necessity for safely coping with the force of moving water. It is my personal belief that river diving in a swift body of water is one of the harshest possible sport diving realms. As such, equipment must be strong enough to sustain the forces placed upon it. Reliability in the world of low visibility, swift water is distinctly different from commonly dived areas of high visibility, low current, tropical open-water resorts. As such, some common practices in less challenging open water maybe inadequate or down-right dangerous when applied to river waters whose current strength can move 1000 foot commercial freighters from their desired path.
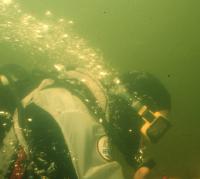
Diving in the world where bubbles do NOT go straight up. It is equipment intensive
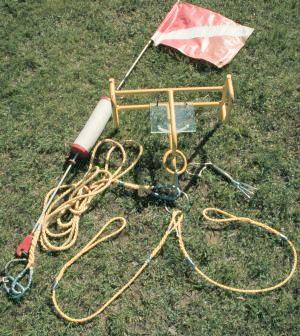
While drift diving, a diver's flag and float are mandatory. (This will not, however, guarantee freedom from molestation. We once had a recreational boater lift our float out of the water into his boat while we were still attached. When confronted, he explained that he thought it was a "great find" to obtain a large floating inner tube with a flag attached. But he noted that he had a hard time pulling us up from the depths. He was NOT happy when we surfaced and requested that he replace the float back into the water so we could continue our dive.) Inner tubes (preferably "truck-sized") are preferred for drifting because they provide a support platform for hooks or carabineers so that heavy "finds" can be placed on the float. Some river divers have suspended large heavy-duty plastic milk crates in the center of their inner tube as a repository for dive gear and recovered objects. We use locking carabineers supported by 1/2" polypropylene line surrounding the tube. The large diameter of this inner tube provides a stable platform to place the divers flag higher above the water, making the flag more visible to boaters. We prefer the flag to be at least 5 or 6 feet above the water's surface. We use the center flag support supplied by Penneform. We prefer NOT to use the inner tube covers that some use for open water training. In dealing with stressed divers, I have noticed that a stressed diver will grab the inner tube and place their arms completely around the tube. The inner tube covers eliminate that alternative and, in my opinion, remove a valuable safety feature from the surface floatation device. In some locations (swift current, greater than 2 knots, and an abundance of active fishing lines, e.g. the mouth of the St. Clair river) towing a float can be extremely hazardous. Under these conditions, with arrangements and cooperation of local law enforcement and/or US Coast Guard authorities, flags are placed only at the exit point.
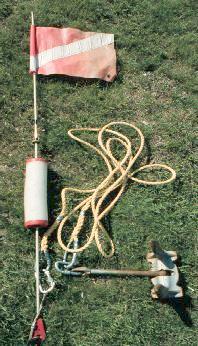
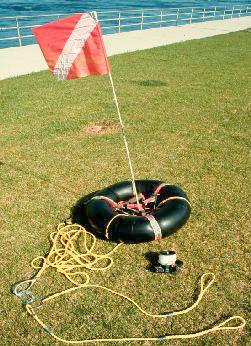
Diving flags: stationary and drift
The stationary flag is a typical dive flag supported by a narrow tube float (easier to handle than a large rig on a float). The rope is a fixed length (here 20 feet) chosen to minimize the scope of the anchor line to the flag. This length will vary with location. Both ends of the rope are eye-spliced. The rope is connected to both float and anchor (12 pounds) by locking carabineers. We have found the combination of eye-splice/locking carabineer to be extremely durable and most reliable. Throwing the float 10-12 feet offshore deploys the float. This is to make sure that the float is visible from the water. In addition, in our locale, there have incidents of flags close to docks being stolen by little kids. While being 10 feet offshore does not prevent this behavior, it does reduce the likelihood of such an event. We typically deploy the anchor at the exit point, enter the water a mile or more upstream and retrieve the flag on exit.
The drift flag rig is assembled to display the flag high enough for boaters to see while distributing the load of the pull of the river on the inner tube between both divers. To accomplish this, we use one line from the float down to the divers. The line is a fixed length chosen to be 1.5 - 2.0 times our maximum anticipated depth and has eye-spliced loops at both ends. The line is attached to the float using a locking carabineer between the eye splice of the line and a figure-eight (a rock-climber's device, see below) that is attached to the inner tube. At the diver's end of the line, a welded stainless steel ring is attached using a locking carabineer. Around the ring are eye-spliced two 6 foot 1/4" polypropylene lines. Also attached to the ring is a small float to help keep the ring above the divers and off the bottom. Each rope ends in an eye-spliced loop so that each diver has a good handhold. In this manner, both divers share the load, the divers may stay together and the inverted Y -shaped line (a "Y-Yoke") floats above the bottom to avoid tangles and entrapments. This arrangement can also be expanded to accommodate three or four divers. However, more than two divers requires additional loops be eye-spiced onto the center loop. Although possible, it can prove cumbersome in turbulent water.
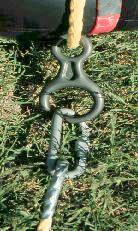

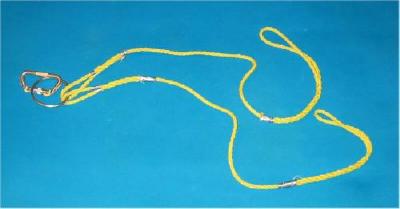
Figure 8 connector, center float, and "Y-Yoke" Buddy Line
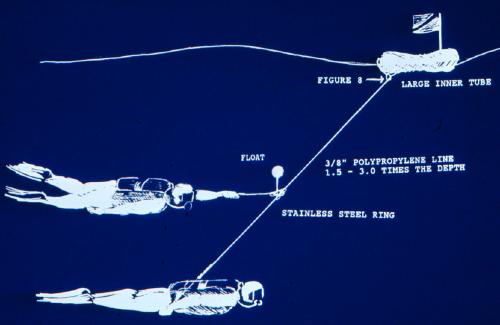
Drift Rig Schematic
(Threesomes often prove cumbersome, particularly with "buddies" who are unfamiliar with each other. Whenever possible, dive teams should be an even number so that true buddy teams are utilized. In coroner inquests, the Ontario Underwater Council has repeatedly pointed out that diving as a threesome was the proximate cause of death. The rationale is that it difficult for three people to maintain contact in limited visibility water and this difficulty increases the risk to all members of the trio.) The use of buddy lines in swift current while operating on the bottom is discouraged (unless in search mode, seeking to snag a large, missing object). If the lines are more than a few feet in length, they will continually snag on the bottom and prove to be a hindrance. For divers who prefer the use of a buddy line, attachment of a net float in the middle of the line reduces the possibility of snagging. The float should be attached to the line using a "cut-splice" for strength; knots should be avoided whenever possible. The line should end with large eye-spliced loops so that the diver can free himself from the buddy line if necessary. When "flying" (hurling downstream 4-10 feet above the objects on the bottom with no intention of contacting the bottom, a short buddy line (2-3 feet) between divers may be used.
Divers should never attach anything to themselves that they cannot get out of underwater. Search and recovery teams may find tethered diving practices to be more effective than divers on a buddy line.
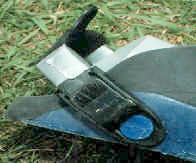
Console gauges are subject to abuse and abrasion. We protect our gauges by covering them with a 1/4" piece of Plexiglas that has been contoured to fit over the console. During the dive we carry the console in the small of our back, between the diver and the tank. This method allows easy access to gauges, keeps diver streamlined and prevents gauge from dragging the bottom and becoming snagged. The Plexiglas provides a smooth surface to facilitate placement of the console in the desired space.
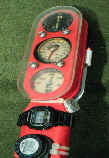
Console and knives
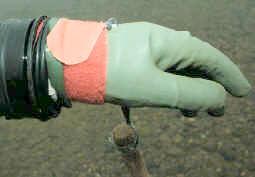
River diving requires a minimum of two knives. The large knife is carried on the thigh, preferably in a custom knife pocket. Knives on the lower leg are too easily snagged. The knife straps should be trimmed to eliminate possible snagging. If the knife is worn on the lower leg, then it should be on the inside of the leg opposite of the diver's primary hand, i.e. right handed divers would wear the knife on the inside of the left leg. Each of the two straps on the knife should go in an opposite direction since the generated strap tension will help keep the knife from rotating around the leg. The second small knife should be primarily for cutting monofilament and can be carried at the diver's preference. This knife is usually carried on the wrist. We have mounted our knives on hard plastic Penneform 3-gauge "instrument cuffs." Thus, the knife is easily obtained and the hard plastic protects wet or dry suit from accidental cuts from missing the knife holster during an attempt to replace the knife. Divers may also carry additional cutting utensils such as diagonal cutters, E.M.T. shears (penny cutters), emergency room clothes' cutters, parachute rigger's knives, and small pruning shears. Some knives contain both a cutting edge and a carbide-cutting rod..
We specifically recommend NOT mounting the knife on the b.c. hose. This placement of the knife holder typically requires replacement of the knife by driving, under physical force, a sharp object in the direction of the throat. In current, subject to sudden movements because of current or dive buddy instability, this practice seems unwise.
Lights can be particularly useful when exploring underwater structures or wrecks. We have mounted long cylindrical lights (Super-Q type) in a holster that mounts on our wrist "instrument cuff" used for the knife. This keeps the hands free and eliminates one lanyard from being snagged. Merely moving the arm controls the direction of illumination.
Gloves are generally worn for protection from cuts and abrasions. River bottoms can be especially harsh on gloves. We protect our dry-suit gloves by using a cotton-backed textured neoprene laboratory glove as an over-glove. When using wrist rings, the outer glove is pulled over the ring to help protect the delicate inner glove. With wet suits, Kevlar impregnated gloves, because of their rugged durability, have become standard.
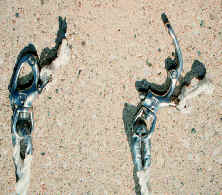
Fins should NOT have any holes or vents. Many divers, in the river or inside wrecks, have had their fins impaled by objects coming up off the bottom through their fins. (In swift. low visibility water, the risk of entrapment or being impaled is quite high, far beyond almost any other environment in which divers play.) The XL "jet fins" because of the large size of the openings are particularly prone to this problem. I have seen divers impaled from objects (steel rods, pieces of wood or wreckage, etc.) on both wreck and river dives. Vented fins place the diver at risk. In strong current, the impalement typically results in the loss of a fin. Fin straps should be reversed, trimmed and securely taped to prevent snagging.
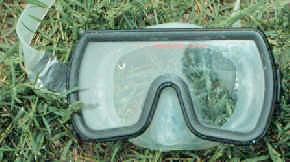
Fins & masks have straps taped to prevent loss and entanglement
Masks should be low volume and the straps should be taped to prevent accidental loss. Purge valves should be avoided because of their susceptibility to leakage in intense current.
Snorkels are generally not worn in intense current. Many divers, particularly those diving with horse-collar b.c.'s will carry the snorkel with them in case a long surface swim is necessary. I carry mine (for use as an emergency resuscitation tool or in case of surfacing in bad surface conditions) in the pocket of my chaps. I do NOT believe that snorkels (particularly in harsh environments) should be anything other than a breathing tube. Any valve increases the possibility of failure when used in swift water.
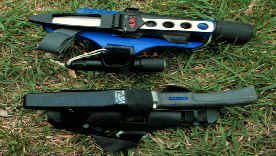
Mesh goody bags pose a real danger to divers and should not be used. They will drag and snag on almost everything, often pinning the diver to the bottom. Some mesh bags are difficult to open with one hand, especially in current. We are now using plastic minnow buckets as goody bags. The flotation chambers and bottom are drilled out so that the bucket will sink. The spring-loaded door makes access rapid and convenient. The bucket is streamlined and not prone to snag. They can be used to carry sharp objects, like fishing lures, without worry that the hooks will cut the diver or the bag. Since our goody buckets often may contain 10-30 pounds of recovered lead sinkers (because of the extreme current, fisherman in the upper St.Clair river typically use 1-2 pound lead sinkers to keep their fishing lines in place. The snag-prone bottom often grabs their tackle and leaves it on the bottom for drift divers to recover), we carry the bucket by running an eye-spliced line from the bucket to a locking carabineer that secures our chest harness. The line is approximately 12" in length. Although a bit awkward on land, at depth, this added line length allows the minnow bucket to travel beside (rather than underneath) the diver. This places the bucket in a convenient location for single-handed operation. The all nylon harness (prefer no metal on the harness since metal will corrode) is a rock climber's chest harness (ours were obtained from REI, an outdoor outfitter). The harness allows the bucket to be readily available and allows the shoulders to support the additional weight of recovered objects. The harness also provides a convenient location to carry EMT shears. The holster resides at mid-chest so the shears can be accessed by either hand. Dry suited divers should ensure that the harness rests underneath their inflation hose. If the harness is above the inflation button, it is possible for the harness to move and strike the inflation button causing an undesired rapid ascent to the surface. The line attaches to the carabineer by a snap-shackle. The snap shackle is attached to the line with an eye-splice. Since the snap-shackle rests directly in front of the diver, the bucket can be easily ditched, should it be necessary, by simply pulling on the short cord of the snap-shackle. Incidentally, this same harness can be used as a harness for any tethered diving operations. We use a stainless steel snap shackle (obtained from any marine supply outfitter) since it a rugged, reliable, and is one of the few secure devices that will easily open under load.

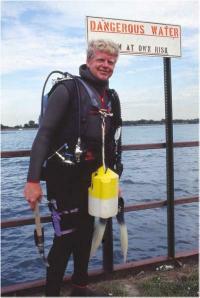
Bucket and Snap shackle (closed and open)
Many divers are under the mistaken impression that it is necessary to dive with excessive amounts of weight on their belts. This is simply not true. We usually dive about two pounds heavy, just enough to ensure that we will immediately sink when we enter the water. Most recreational diving will be in a drift mode and the extra weight forces the diver to do too much work. Commercial divers who must remain fixed in swift water will wear more weight for stability, but this simply does not apply to the recreational drift diver.
Many divers have lost weight belts in swift water. The swift water scavenger is going to be hugging the junk-covered river bottom and every weight belt fastener that we have tried has failed. The problem is not excessive weighting; the problem is that the buckle can be snagged and opened by some object on the bottom. In heavily trafficked water a direct ascent to the surface is not a particularly inviting prospect. To avoid weight belt loss we use two buckles. The buckles are arranged the same way on the belt so that the belt can be ditched, if necessary. The belt can be ditched with two buckles as easily as with one. The secret to successful ditching, regardless of buckle system, is practice. We practice ditching the belt every time we remove the belt at the end of a dive. In my early days of river instructing, 40-50% of students lost a belt in training. After adapting the double buckle system, there has been no loss of belt. In the Great Lakes region more and more divers, especially those diving deep (often beyond sport diving depths), under ice, inside wrecks and in swift water are going to the double buckle system. The double buckle is not recommended for novice divers; it is used by experienced divers in specialty environments where weight belt loss poses a
substantial risk to the diver. Divers should not use this system without practice to ensure that they can easily drop their belt. (Remember: It is best to practice ditching every time the belt is removed.)
Divers should never put on a piece of gear that they cannot remove. The weight belt should have nothing attached but weights. The use of hooks, on the belt or any other location on the diver, is discouraged. Of particular concern are the hooks which have no securing device other than a simple spring. Hooks can snag cables and other objects and have the potential to pin the diver in a position such that the diver cannot free himself. Indeed, such hooks have been termed "suicide hooks" because they were responsible for the death of a diver on the Andrea Doria.
Double buckle and commercial grade chaps
When diving in colder rivers, hypothermia is a problem. Dry suits are being used for thermal protection. We strongly advise river divers to use commercial grade suits, regardless of the manufacturer. We believe the swift river environment to be one of the most demanding environments in which divers play and the increased reliability, ruggedness and dependability of commercial suits is the most cost-effective for the frequent diver. In our experience, the most durable dry suit material has been CF200. Since dry suits are expensive and the river environment harsh, some type of chaps or coverall may be worn to protect the thermal protection suit (wet or dry) from abrasion damage. It is essential that the leg portion of the chaps be easily opened under stress. If wearing only coveralls, it is possible (I have seen it occur; I had to cut the diver free) for some object to penetrate the open leg portion and impale the diver sufficiently to keep them on the bottom. In this case, it is necessary to cut the coveralls. (This is NOT easily done given the strength of fabric used and the awkward nature of the operation while pinned on the bottom in heavy current.) However, the Velcro attachment allows east one hand opening, if such a pinning occurs. The commercial grade chaps have pockets. I carry my snorkel and a pair of diagonal cutters in the pockets.
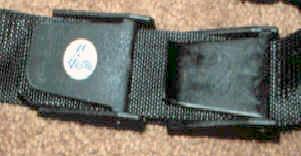
The commercial grade chaps that I wear are no longer available. Many of my students have made their own using pack cloth. The waist strap uses a quick connect fitting common to diving gear. (I use duct tape on this strap to prevent the waist strap material from running through the quick-connect fitting.) An additional 10 1/2" x 7 1/2" piece of pack cloth is sewn to the chaps as additional protection to the knee area. The approximate measurements are indicated below:
Chaps Dimensions
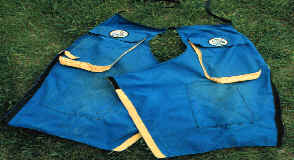
The legs are secured with 1" Velcro strips. The two diagrams below indicate the closure mechanism. The left image below shows the inside of the chaps with the black "female" Velcro strip running up the "inside" of each leg piece This "female" strip has a 3 1/4 " extension that is carried over and sewn to the front side of the chaps. (This short "carry over" piece is shown in the right image). The yellow strips shown are reinforcement material sewn on the outside edge of the chaps to give strength to the Velcro band. The other edge of each leg of the chaps has a "male" Velcro strip that also extends 3 " beyond the chaps body to form a tab used in securing the closure. This tab is shown in the right image below.
To wear, the waistband (using a quick connect fastening), is secured. The open chaps are then wrapped around each leg and the Velcro portions are matched. The short "male" tab then secures the closure. In the right image below, the legs have been folded down the middle to simulate closure around the legs. The left side of this image shows how the Velcro is matched prior to closure. The right leg in this image shows the completed closure. This mechanism provides a secure wrap to protect the diver's suit while providing an easy-to-use method of opening the chaps should the need arise.
Chaps: Inside and Folded
Use of the hands to grip objects is essential in river diving. We therefore recommend some form of dry glove with a dry suit in cold water to help keep the hands from losing dexterity. Modern dry suits provide no inherent buoyancy. The use of a B.C. with a modern dry suit should be mandatory. Most diving problems occur at the surface. A b.c. guarantees that the diver can stay on the surface, in a breathable atmosphere, and solve the problem. The lack of a b.c. coupled with dry suit over-weighting is a real and persistent danger in our sport. Indeed, such a combination has proven fatal, and to more than one diver .As one commercial diver once said to me, "lead rhymes with dead!" Lack of a b.c. while diving a dry suit has been instrumental in several diver fatalities in the St.Clair river system. This practice is sometimes called " death seeking behavior."
In intense swift water buddy breathing may be difficult, if not impossible. The use of an octopus is recommended. The octopus is most often carried secured inside a pocket or "buddy ball" to protect the octopus from debris while providing ready access to the diver. Note that by securing the octopus hose and the short inflator hose very tightly to the top of the stabilizer jacket with Velcro that the large loop of hose behind the diver between the regulator first stage and the divers shoulder is eliminated. The loop that forms is between the shoulder and the stabilizer pocket. This loop actually facilitates finding the octopus and is such that any entanglements are in an area where they can be seen by the diver and not behind the diver's head. Another handy way of carrying the octopus is by using a snorkel keeper: the top strap of a stabilizer vest passes through one hole of the keeper and the other hole of the keeper goes around the mouthpiece of the regulator. In this manner the octopus is held securely close to the body and is readily available by pulling the regulator away from the keeper. Long regulator hoses should be avoided as much as possible. They form large loops from the tank to the regulator and can be a potential source of entanglement.
We do not recommend the use of combination inflator hose-octopus systems as alternate air source in intense current. There have been many reports along the St.Clair river of free flow problems with these types of devices. There is also concern that the air flow characteristics of these devices are insufficient for delivering high air flow demanded by a diver in current under the physical stress of swimming in current and handling an out-of-air scenario. Finally, many river divers prefer a diaphragm first stage, as opposed to a piston. The moving current drives sand and silt into all pieces of gear and some are concerned that this will damage the piston of their regulator.
The inflator hose to the B.C. should be shortened to minimize the size of the loop that this hose makes between first stage and the B.C.
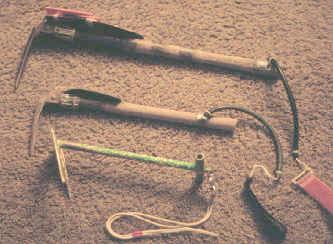
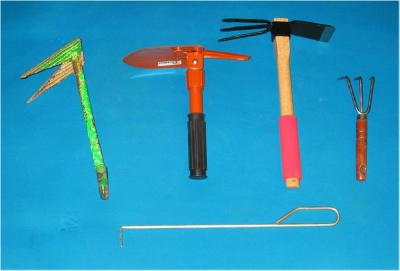
The true secret to enjoyable swift water river diving is the ability to control your position on the bottom of the river. Divers have tried a variety of devices such as screwdrivers, knifes, pieces of pipe or rod, small rakes or gardener's trowels. The gardener's trowels or rakes can provide excellent tools for searching a clay or muddy bottom, but they often are not strong enough for maneuvering in extremely swift water. Broken 3 prong gardening tools are a frequent source of disappointment to those who use them in intense current.
We have had the most success with a device we call the "river stick." This device is a surplus entrenching tool that has a 6" spike on one side and a narrow 2" blade on the other side with a 24-28" handle. A hole is drilled in the handle and a lanyard is attached. (Note that 2" Velcro attachments should be used so that a portion of the end may be gripped. In cold water, with decreased dexterity, removing a Velcro strap that has nothing to grasp can be very difficult.) Unfortunately, these tools are in very scarce supply. There are now cheap imitations in the surplus stores, but they are too weak to be of use. At present, we are purchasing surplus entrenching tools that have a shovel on one side and the 6" spike on the other. These have a longer handle and are much more heavy duty. The shovel is cut off and trimmed on a grinder. Only the 6" spike is used for controlling a diver's position in the river. Lastly, a seat-belt cutter (purchased from EMT supply vendor) is attached to stick. The seat belt cutter's slotted cutting edge (the orange object secured bear the point of the stick in the illustration below) is superb for cutting nylon filament. Mounting (with tie wraps) it on a river stick means that monofilament line can be cut, if needed, by a flick of the wrist, without having to grab a knife.
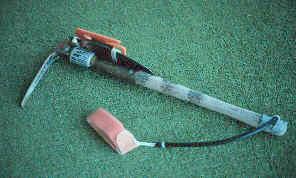
River stick and Velcro attachment
Another tool commonly seen in the St.Clair system is Rick Ryan's "Crawl Dad." This tool uses two prongs for gripping. Although we prefer the "stick" while in drift mode, we consider the "crawl dad" to be the tool of choice when scavenging in a stationary search mode. The current carries the silt and debris downstream while the tool is used to dig. This method of searching has proven very successful for scavenging through historical underwater garbage dumps looking for bottles and antiques.
"Crawl Dad" close-up and Size Comparison: "River Stick," surplus entrenching tool, and "Crawl Dad"
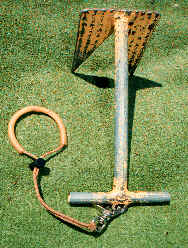
Extremely intense currents require the use of a "creeper." We know of no commercial source of this device. A commercial welder using 3/4" steel rod made ours based on based on a picture found in the NOAA Diver's Manual (Second edition, p. 9-8). Our design adds a third leg providing a stable platform when resting or using the device as an anchor. Our front legs are also angled back towards the diver. This facilitates forward movement and gives a stronger "bite" when anchored. Since the total weight of this device, 17.5 lbs (7.9 kg), is sufficient for in-current stability, our design requires no additional weight. This device can be used to "walk" a diver upstream by alternately moving one side, then the other, forward (see Techniques ). "Creepers" are tiring to use. By wearing a climber's chest harness and hooking a short line between the diver and the "creeper," the diver can stop and rest by letting the line and the harness hold his position to the "creeper." This line is not tied to the "creeper;" it is secured using a non-locking carabineer at the "creeper" end and a snap-shackle at the diver's end. Using a longer line will allow the diver to perform pendulum swing searches downstream from the "creeper" (see Techniques ).
The "creeper" is also useful as an anchor while performing stationary searches in mild currents. A diver's float and flag can be attached to the "creeper" so that no diver is burdened with the task of holding the float. One or two divers can attach themselves to the creeper using a chest harness and/or 'Y-Yoke" buddy line. (This is the similar, but shorter and without center float, to the rig used in drift diving. The divers then search downstream from the creeper (see Techniques ). When the limit of the line is reached, the creeper is moved. The surface float allows surface support personnel to know exactly what area was searched.
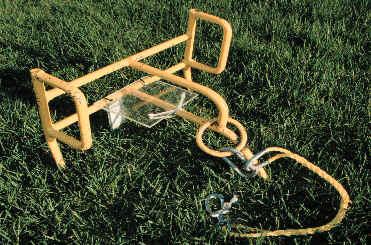
"Creeper": Single user and Anchored search mode
"Creeper" Dimensions
In excavation mode, a variety of tools can be deployed, depending on the bottom material and amount of material that needs to be moved. On the left, below, are a variety of tools we have tried: The "crawl dad", mini-entrenching tool, garden ax, garden prongs, and (across the bottom), a single point scraper. For tough bottoms, the "crawl dad," is our tool of choice. When the bottom is soft or sandy, a paddle or kid's sand scrapper tool works well to gently lift the bottom material up to be blown down-stream by the current. Finally, in some situations, a sand sifter commonly used in gold dredging or in conjunction with a metal detector on a beach can also be an effective tool.
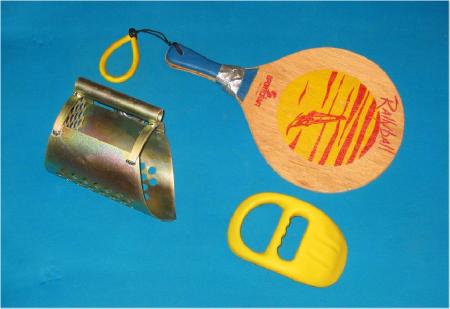
Scrapers & Paddles
Occasionally, there is a need to do some light underwater cutting. In our hands, a gardener's pruning saw (see below) works much better than typical carpenter saws taken underwater. The image below shows the saw in folded (right) and handle-deployed (left) positions. The wrist support (arm goes under the wrist support to grab the handle) provides a stable means to use the 10" blade for light cutting operations.
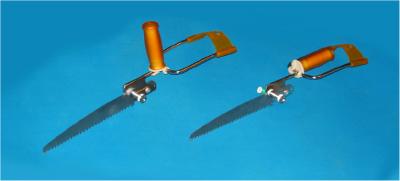
Gardener's Pruning Saw
It is always useful to have some idea of conditions underwater prior to entering. One tool that can be of use is the Secchi Disk, below left. This is a weighted circle of alternating light and dark quarters that is attached to a measured line. The disk is dropped into the water until the observer can no longer make the distinction between light and dark areas. Checking this depth of this distinction disappearance on the measured line gives a reasonable indication of the vertical underwater visibility. We have added a thermometer to ours. A Fisherman's thermometer, below right, also provides temperature at depth information.
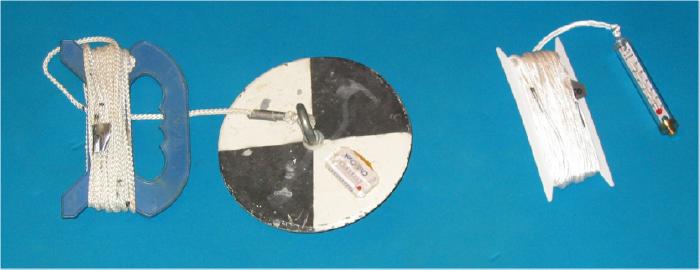
Secchi Disk & Fisherman's Thermometer
Conclusion
All specialty environments require equipment primarily designed to improve diver safety and performance for an individual specific environment. Unfortunately, there is NO UNIVERSAL SYSTEM that applies to all diving environments, for all divers, under all diving conditions. The above is a summary of equipment used successfully for more than two decades of diving in one of the most intense current situations in North America. It is up to individual divers to determine if our equipment is applicable to their diving scenarios.
This is one portion of series of articles on river diving. Others are
Reading Rivers River Diving: Navigating In Currents River Diving: Techniques
Lecture Slides for the river diving course at River
Go To: Home About "Harris" Articles Slides War Stories Editorials Links Fini
Photo Credits:
Surface Photography: Larry "Harris" Taylor
Diver Underwater: Mike Spears
Sketch Artwork by Maureen Reilly
Special Thanks to:
Rick Ryan for the "Crawl Dad"
David Huelke for fabrication of the "Creeper"
Larry "Harris" Taylor, Ph.D. is a biochemist and Diving Safety Coordinator at the University of Michigan. He has authored more than 200 scuba related articles. His personal dive library (See Alert Diver, Mar/Apr, 1997, p. 54) is considered one of the best recreational sources of information In North America.
All rights reserved.
Use of these articles for personal or organizational profit is specifically denied.
These articles may be used for not-for-profit diving education.