Wiring Your Home
Now we will explore putting together the basic hardware necessary to make a network throughout your home. We will start with the most basic connection - twisted pair Ethernet. In later chapters, we will explore more exotic technologies such as wireless or phone-line networking.
Ethernet networking is generally the least expensive, fastest, and least trouble free connection if you can run the wires to the locations where you want to use your computers. Even if you have support for wireless computing in your home, you will probably still use Ethernet for a few of the computers in your home.
TODO: This is what I wanted to say in this chapter, but somehow it seems to be missing something. perhaps it is too much or too little detail here and there. - Chuck
Ethernet Cabling and Network Hardware
 There are two basic forms of Ethernet cabling - Coax cable and twisted pair. Since the mid-1990's, the industry has gone completely to the twisted pair approach. The original Ethernet design from the 1960's consisted of a single cable which was connected along the back of each computer. The cable looked like the typical cable used for cable television today. When a computer sent data out to the network, all of the computers "saw" all of the data going across the network. Much like a two lane road, there were "traffic rules" about when you could "jump on" to the network and when you had to wait to let traffic pass by.
While this approach was simple and allowed a single long cable to be fed along the back of many computers, simplifying wiring costs, it did not work very well when one person disconnected the cable, effectively removing half of the computers from the network.
 Twisted pair wiring and network hubs solved the problems of Coax cable Ethernet. In twisted pair, the computers are wired in a star configuration. Each computer had a dedicated connection back to the hub and when one computer was disconnected or had a problem, the rest of the network was unaffected. But because Ethernet was well established and the protocols which used Ethernet depended heavily on a broadcast medium, inside the hubs all of the ports were electrically connected together. One many hubs with activity lights, all of the lights seem to blink at the same time. This is because the traffic is being sent out on all of the ports at the same time. This means that a 10Mb/sec hub can only move 10Mb/sec total regardless of the number of computers connected to the hub. Hubs are still widely used in many low-traffic situations such as a home or small office when there are less than 10 computer systems connected to a network.
 The next major step in the evolution of network equipment was the switch. Because the Ethernet protocol assigns a unique network address to each network card, it was possible for a switch to automatically "learn" which computer systems were located on which ports. When a switch first comes up, it acts like a hub, copying all incoming data to all the ports at the same time. But as the data is transmitted, the switch looks at the source address of each packet of data and makes a note which port it received the data. When a packet arrives for that workstation, the switch only copies the data to the proper port. Once a switch has identified which workstation(s) are on which port, the data is only copied to the appropriate port. This means that a 10Mb/sec switch with 8 ports is capable of up to four simultaneous data transfers at the same time for a total of 40Mb/sec overall. Some traffic (such as ARP packets - described previously) are special broadcast packets which are copied to all the connections of a switch. Switches work very well in networks from 5-250 computers because much more aggregate traffic can be moved through a switch. Switches are generally reasonably priced and have very good performance. In very large networks, their primary limitation has to do with how they handle broadcast traffic.
Switches have an added advantage in that most switches allow you to mix and match between different speed Ethernet equipment. The most common application of this is to use a combination of 10Mb/sec and 100Mb/sec Ethernet equipment in the home. Because switches are making dynamic connections for each packet, two 100Mb/sec computers can be moving data at 100Mb/sec, while two 10Mb/sec computers move data at the slower rate. A switch can even slow down the data, allowing data to be transparently moved between a 100Mb/sec computer and a 10Mb/sec computer.
In a home network environment a switch is generally preferable unless the cost gets too high. The price of an 8-port switch is pretty reasonable, but 16-port switches become more expensive because their typical application is in a business environment.
Network Design
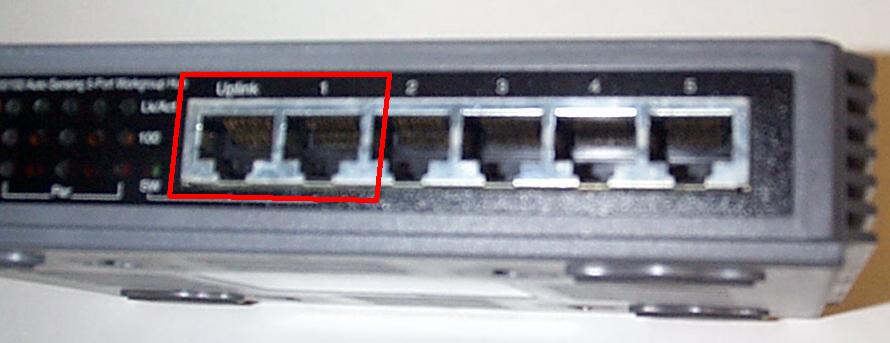 It is possible to connect a number of hubs and switches together to form your network. This can allow you some flexibility in wiring. For example, you can run one wire to a room, and using a hub within the room you can conect several computers to your home network. Using multiple hubs is called cascading. Cascading is made much simpler when your hub has an uplink port. Most of the ports on your hub are wired in the standard manner to connect to a workstation. One some hubs, one of the ports is wired both as a normal port and as an uplink port. You cannot plug a cable into both the uplink port and the corresponding workstation port at the same time. The five port hub pictured here can either function as a hub for five workstations or as a hub for four workstations with an uplink.
 This diagram shows three four port hubs properly connected together with the maximum number of workstations attached to each hub. The top hub (root) has two workstations connected and uses two of its workstation ports up provide uplink connections for the lower hubs. Its uplink connection is not used. The two lower hubs, each have three workstations connected and their uplink port connects to the top hub. The workstation port port associated with the uplink port is not connected to anything.
When cascading hubs together, you cannot connect beyond three levels from the "root" hub to the end hub. The previous figure shows a two-level cascade. While this seems to be a somewhat limiting factor, with three levels of 24-port hubs, you can have over 10,000 computers. Also, switches do not have any "cascading" limitation like hubs. Because of this, you can think of any port on a switch as at "level zero" in terms of cascading.
In a hub, the only difference between a normal port and an uplink port is simply which signals are routed to which connectors in the cable. So "port 1" and the uplink port are the same port with slightly different wiring configurations. As a matter of fact, if you do not have an uplink port, you can use a normal port on the hub to make the uplink connection, but the cable must be a special cross-over cable or a cross-over adapter must be used. But most seasoned network professionals tend to avoid cross-over cables like the plague. The problem happens when your identical looking cross-over cable ends up in a box with a bunch of normal cables. For this reason, many cross-over cables are made out of red cable or specially marked in some other way.
 The most common use of a cross-over cable is to create a network with exactly two computers and no hub. You cannot use a normal straight-through cable to connect two computers directly to each other. A crossover cable allows a direct connection. This is typically done when two people want to create a temporary network for the purpose of playing multi-person video games. You can also purchase cross-over adapters which connect two normal cables together to produce a cross-over cable. That way you never have to purchase any of the (dreaded) cross-over cables.
Cable Length
Because of the underlying protocol used to control the traffic on an Ethernet network, it is necessary to limit the overall "distance" covered by a single Ethernet network consisting of hubs. No network should be more than 70 meters in "diameter". To compute the diameter of the network simply add up the individual lengths of the cables which data would have to pass through as it moves between the two "farthest away" workstations. In a simple network with one root hub, this simply means that no cable run can be greater than 70 meters. In the two level cascaded diagram you would have to add four cable lengths together and keep the total distance under 70 meters. Luckily in most homes, this is not much of a concern because the size of the home limits the overall cable length. If for some reason, you need to go beyond 70 meters, similar to the cascading rules, each time you encounter a switch, you can set the "accumulated distance" back to zero.
The actual rules for building Ethernet networks are complex and when completely describe take up a book with hundreds of pages. In this book, we distill those rules into "rules-of-thumb" which should be sufficient to build a reliable home network. To design a large network for a business with hundreds of workstations, you should consult a book such as XXX-XXX-XXXX.
Building Twisted Pair Ethernet Cables
For your fist few Ethernet cables you should buy good quality cables so you know that your cables are not causing technical problems. However, you should not be afraid of building your own cables once you gain some experience. And in the next section, we will talk about completely wiring your home - having the ability to build a cable is an important skill when wiring your home.
 Building a cable is easier and cheaper than you think. First you will need some supplies and equipment.
-
You can purchase Category-5 cable and crimp-on cable ends from many home improvement stores, electrical supply stores, or via mail-order.
-
The tool to crimp on the cable ends is relatively inexpensive and will cost around $10-$15 to purchase.
You may want to check the author's website (www.homenetworkguys.com) for some links to where you can purchase tools and supplies for wiring.
The following are the basic steps to install a crimp-on end to a Category-5 cable:
-
Cut the cable to the proper length.
-
Gently score the outer sheath to remove about 3/4 of an inch of the outer sheath.
-
Untwist the exposed wires.
-
The goal of the next step is to arrange the wires from left to right in the proper order and very flat so they can be inserted into the crimp-on cable end. The order from left to right is orange-white, orange, green-white, blue, blue-white, green, brown-white, and brown.
There are two different "standard" wire orders called EIA-568A and EIA-568B. This parcicular order EIA-568B which is somewhat more common. the ordering youchose does not really matter as long as you use the same approach on both ends of the cable. While this order may seem strange, it makes some sense to think of it from the center out, where the blue-white/blue pair are the center. As you place the wires in order keep them very flat and very tightly packed so they can easily slide into the crimp-on connector.
-
Once you have them in the right order, held very tightly, trim the exposed wired to 1/2 of an inch. Without letting go of the wire, slide the crimp-on connector on so the wires so that the connectors are facing you, the cable is pointed upwards, and the orange-white wire is to your left.
-
Press the wires firmly into the connector, making sure that the wires stay in the proper order. The connectors are designed so that it properly aligns the wires as long as the wrier are in the proper order.
-
Once the wires are pressed into place, you should take a final look to make sure that everything is in order. The cable sheath should be inserted approximately 1/4 inch into the connector. The connectors are designed so that you can lok at them from every angle to make sure the wires have been inserted properly.
-
Once the final inspection is complete, Simply insert the connector into the crimeper and crimp the connector. most crimpers have an automatic stop so you cannot overcrimp the connector.
-
Again, you shold examine the connector closely to make sure that the wires are properly lined up.
 Once you have assembled both ends of the cable, you should test the cable in a known configuration to make sure that it works properly. A very simple test is to replace a known cable with your new cable and make sure that everything continues to work.
Cable testers range in cost from $50 to several thousand dollars. For a home network you can get by with the lowest price cable tester. The low pricer testers simply test that the poper wires are connected to the right pins. The more expensive testers can certify a cable as capable of handling data up to a certain speed.
If you would like a more polished look for your cables, you can purchase "plug boots" for each end of your cable. You slide the boot onto the cable before you terminate the connector. Once the connector is attached, the boot is slid over the connector and held in place with a small drop of glue. This way your cables can look exactly the same as the cables you purchase in a store.
Once you gain confidence building Cat-5 cables, it actually is fun and not too difficult. If you take your time you will probably find that your very first cable will work.
Wiring A Wall Jack
Once you have built confidence in your cable-building ability, you may want to wire all or part of your home. The simplest approach is to run long cables throughout your home to some common location and plug thecables into a hub. You pull the cable between the locations and terminate the ends with the standard male crimp-on connectors.

At some point, you may want a more polished appearance with some type of Cat-5 wall jack.
Then you can run a short cable from the wall jack to the computer. To be even more "professional", you may want to run all the cables to a central location in a patch panel and then run patch cables from the patch panel to the hub or switch.
The only additional skill beyond wiring cables that is needed is the ability to string write through your home and the ability to wire Cat-5 jacks. like building cables, wiring jacks is relatively simple once you know the basics.

-
Jacks are somewhat more expensive than cable ends. You can easily spend $5 or more for each jack. Fewer stores stock jacks so you may have to order them mail order or shop around a bit. One nice solution is a modular jack system where you can put different combinations of jacks into standard openings in wall plates. Levitron (www.levitron.com) is one of the leading vendors for modular jack systems.
-
You will also need a punch-down tool to push the wires into the jacks. If you will be terminating more than five jacks it would be a good idea to purchase a spring loaded punch down tool with a automatic cutting blade for about $50.00.
There are actually two different types of punch-down systems. The older system is a "66-type" was used for phone systems and Category-3 wiring. The newr system used for Category-5 wiring is the "110-type". Most likely you will not encounter anything other than the 110 type equipment.
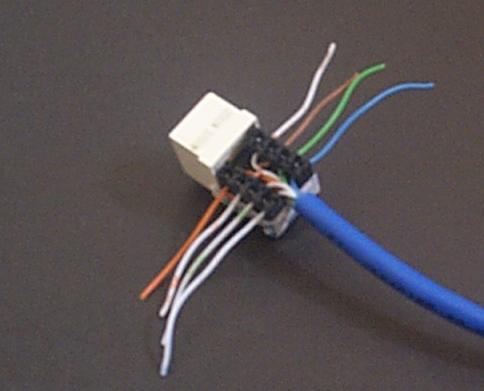 Most types of wall jacks will actually have a color coding so you know which wires from the Category-5 bundles are to go to which terminal. The steps to wire a jack as shown above are as follows:
-
Carefully score the outer jacket of the cable and remove about 1.5 inches of the outer sheath.
-
Figure out where each pair must be terminated in the jack. Untwist a pair of wires, place each wire in the terminal and punch the wire down. If you have an automatic cutter, it will automatically trim off the excess wire at the same time. You want to maintain the twists in the wire as much as possible, untwisting only in the last 1/4 inch if possible. Also make sure that the wries are placed so that the sheath will be properly crimped into any type of strain relief. In the figure above, all of the wires have been punched down but not yet trimmed so that you can see the detail.
-
Continue to punch down the remaining wires, keeping the wires twisted as long as possible.
-
Trim off any extra wire if you did not use a punch down tool with a cutter.
-
Install any strain releif as necessary.
-
Install the jack in the wall.
Like any other component cabling that you build, your newly wired wall jack must be tested as well. You can use the cable tester with a cable that is known to be good plugged into your jack. Since all of the cables, wall jacks, and connectors are wired "straight-through", you can test them at any point and in any combination using the same tester.
Working with Category-5 Cable
In this section, we discuss what you may want to do when wiring your home to provide a complete home network. We won't cover cutting holes in your walls, installing outlet boxes, or fishing wires through walls. What we will cover is the basics of pulling data wire and some general rules which you should follow as you string wire throughout your house.
In many ways, ategory-5 cable is pretty rugged and you do not have to treat it with kid gloves. But here are a few basc rules to follow as you run wire throughout your house:
-
Category-5 cable is designed to be pulled through relatively long conduit so it has pretty good tensile strength. You can pull pretty hard without damaging it. However depending on why you have to pull hard, you may be damaging the cable.
-
Category-5 cable does not to be bent around very tight corners. A good rule of thumb is to keep a 6-8 inch radius on all cable bends. Generally if you bend the cable to agressively it will tend to fail at the higher bit rates such as 100Mb/sec. Sometimes while you are pulling the cable, it will get tangled in a knot. If you pull too hard, you can end up crimping the cable which can cause problems.
-
You should not use a standard staple gun to attach Category-5 cable to your walls and studs. A staple gun can also squeeze the cable too tight and cause problems. A better approach is to use a special cable stapler or to use a hammer and wrie staples. But with the hammer you must make sure that the staple only "gently" touches the wire. Another approach is to use a nylon wire-tie around the wire and then stapling the "tail end" of the wire tie.
-
You will want to avoid cable television wiring, power wiring, flouresent lights as much as possible. You mill not be able to avoid these sources of interference completely - but whenever possible, have your data cable simply cross these sources at a 90-degree angle so as to minimize the interference.
-
When you purchase your cable, consider purchasing cable in a "self-feed" box or on a spool. You may have purchase somewhat more than you need, but the convienence of being able to feed your cable without tangling is very helpful. Usually you have to purchase 1000 feet of cable to get a spool or pull box. But by purchasing extra cable, you can leave plenty of exceess cable on each end of your cable pull without feeling too bad.
These rules can be summed up in a single basic idea: Category-5 cable is happiest when you treat it gently during installation. For that reason, you need to take our time working thr cable through and around your walls, plumbing, and furniture. It is often quite helpful to have a helper who can make sure that the cable does not get tangled as it is fed out.
Wiring a Home Under Construction
It is much simpler to wire a new home while ist is being constructed. You can have a home with flexible data and entertainment network capibilities in every room.
Some builders are even providing home wiring as an option in many new homes. Home data wiring is often done by companies who specialize in home security, home theater, and whole house audio. A rough estimate for a professionally installed home data network is about $150.00 per network connection.
Some professional installers will suggest "structured home wiring". Most structured wiring consists of some combination of Category-5 cables and coax cable. The Category-5 cable can be used for data, telephone, security, low-voltage power, and home automation. The coax can be used for Cable television and satellite television. Either technology could be used for whole-house audio or video. A typical structured home wiring solution consists of two Catgory-5 cables and two RG6 Coax Cables. Some wiring even includes two fiber optic cables as well. the key idea is to install the wiring once and then upgrade the equipment in the basement and the equipment in each all outlet as your needs change.
If you are considering structured wiring, the biggest concern is the cost of the equipment to connect to the cables, both now and in the future.
 An approach that we prefer is to emulate the approach used in most commercial buildings. Commercial installations prefer conduit for wiring because it offers the ultimate in long-term flexibility. Conduit also allows you to build only the capabilities that you need and no more. You can install a low-cost cabling solution now, use it for ten years. Then when some new technology becomes available and is inexpensive, you can remove your first solution and put in the new technology using the same condut.
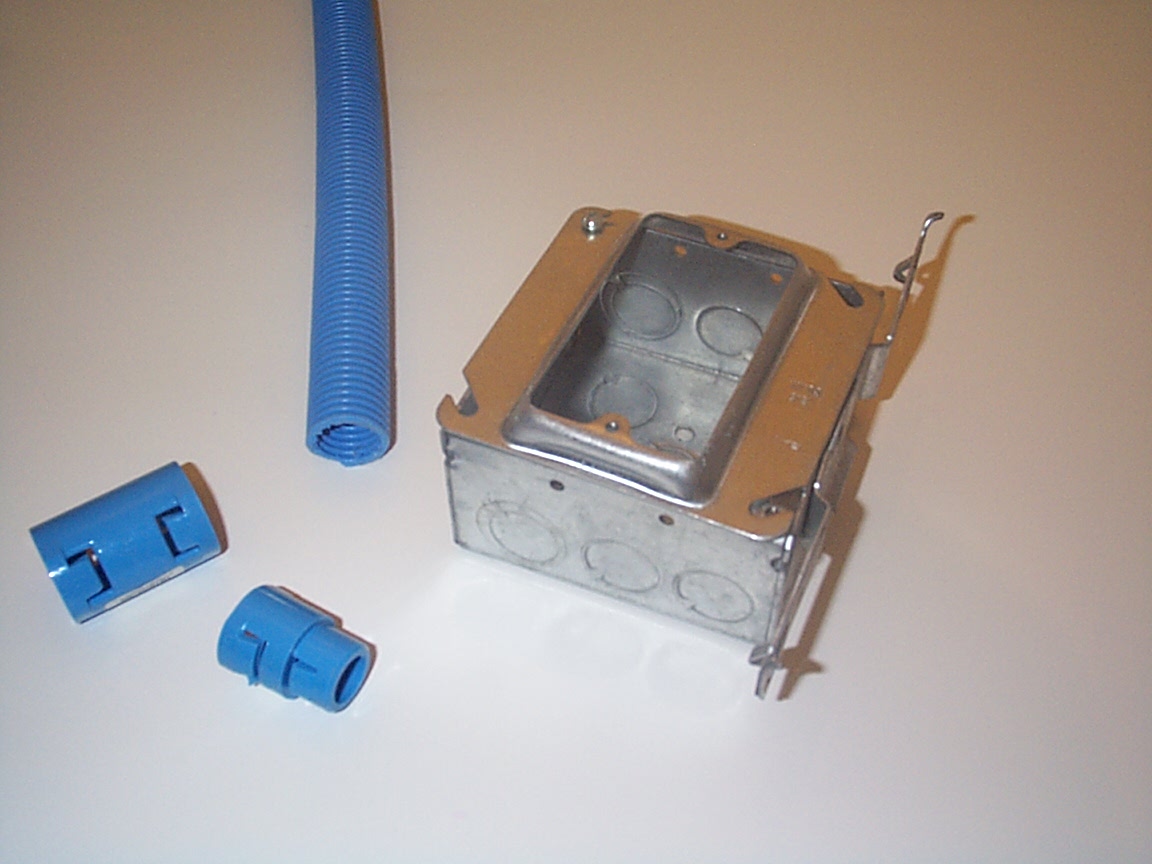
Depending on a number of factors, a conduit solution may actually be significantly cheaper than a structured wiring solution even if it is installed by a professional. There is a very effective flexible plastic conduit that is very easy to install. Professional electricians laughingly call this "smurf-conduit" because of its blue color. But it has a number of signifcant advantages over wire installed directly in the walls.
When installing cable or conduit in a new home, there are a number of important things to keep track of:
-
Make sure to contact a building inspector. In most localities, the local building inspector treats phone, entertainment, and data networking as low-voltage and so the electrical inspector will not need to inspect the actual wiring. However whenever you are drilling holes through floors and installing equipment in the walls, there may be codes that you have to follow. For example in some locations you must "fire-caulk" any opening between floors.
-
You will need to coordinate with your builder. If you install conduit, the the actual CATV and telephone installation mat be done much later.
As you plan where to put outlet boxes and conduit runs, try to think about future applications. Some of the locations that you might not think of right away include:
-
Above the kitchen cabinets - remote speakers, cable TV, or even a smart refrigerator.
-
In a master bathroom
-
Inside closets - a closet might be a good place to put a shared printer
-
Inside cabinets
And make sure that each time you have a data jack that there is power nearby. While low voltage power solutions seem promising, most standard equipment will need standard household power for quite a qhile. Once you have set out to install conduit, you should use conduit for all of your connections (telephone and CATV). This gives you ultimate flexibility for future deployment as your wiring needs change over time.
Conclusion
In this chapter, we have examined a number of different possibilities for wiring a home. Building cables and installing wiring for data network is not technically challenging once youget the hang of it. By following a few simple rules, youshould be able to design and build a full-featured home network.